Vue lecture

Il y a de nouveaux articles disponibles, cliquez pour rafraîchir la page.

Is Your Container Image Really Distroless?

Containerization helped drastically improve the security of applications by providing engineers with greater control over the runtime environment of their applications. However, a significant time investment is required to maintain the security posture of those applications, given the daily discovery of new vulnerabilities as well as regular releases of languages and frameworks. 

The concept of “distroless” images offers the promise of greatly reducing the time needed to keep applications secure by eliminating most of the software contained in typical container images. This approach also reduces the amount of time teams spend remediating vulnerabilities, allowing them to focus only on the software they are using. 

In this article, we explain what makes an image distroless, describe tools that make the creation of distroless images practical, and discuss whether distroless images live up to their potential.

2400x1260 is your image really distroless

What’s a distro?

A Linux distribution is a complete operating system built around the Linux kernel, comprising a package management system, GNU tools and libraries, additional software, and often a graphical user interface.

Common Linux distributions include Debian, Ubuntu, Arch Linux, Fedora, Red Hat Enterprise Linux, CentOS, and Alpine Linux (which is more common in the world of containers). These Linux distributions, like most Linux distros, treat security seriously, with teams working diligently to release frequent patches and updates to known vulnerabilities. A key challenge that all Linux distributions must face involves the usability/security dilemma. 

On its own, the Linux kernel is not very usable, so many utility commands are included in distributions to cover a large array of use cases. Having the right utilities included in the distribution without having to install additional packages greatly improves a distro’s usability. The downside of this increase in usability, however, is an increased attack surface area to keep up to date. 

A Linux distro must strike a balance between these two elements, and different distros have different approaches to doing so. A key aspect to keep in mind is that a distro that emphasizes usability is not “less secure” than one that does not emphasize usability. What it means is that the distro with more utility packages requires more effort from its users to keep it secure.

Multi-stage builds

Multi-stage builds allow developers to separate build-time dependencies from runtime ones. Developers can now start from a full-featured build image with all the necessary components installed, perform the necessary build step, and then copy only the result of those steps to a more minimal or even an empty image, called “scratch”. With this approach, there’s no need to clean up dependencies and, as an added bonus, the build stages are also cacheable, which can considerably reduce build time. 

The following example shows a Go program taking advantage of multi-stage builds. Because the Golang runtime is compiled into the binary, only the binary and root certificates need to be copied to the blank slate image.

FROM golang:1.21.5-alpine as build
WORKDIR /
COPY go.* .
RUN go mod download
COPY . .
RUN go build -o my-app


FROM scratch
COPY --from=build
  /etc/ssl/certs/ca-certificates.crt
  /etc/ssl/certs/ca-certificates.crt
COPY --from=build /my-app /usr/local/bin/my-app
ENTRYPOINT ["/usr/local/bin/my-app"]

BuildKit

BuildKit, the current engine used by docker build, helps developers create minimal images thanks to its extensible, pluggable architecture. It provides the ability to specify alternative frontends (with the default being the familiar Dockerfile) to abstract and hide the complexity of creating distroless images. These frontends can accept more streamlined and declarative inputs for builds and can produce images that contain only the software needed for the application to run. 

The following example shows the input for a frontend for creating Python applications called mopy by Julian Goede.

#syntax=cmdjulian/mopy
apiVersion: v1
python: 3.9.2
build-deps:
  - libopenblas-dev
  - gfortran
  - build-essential
envs:
  MYENV: envVar1
pip:
  - numpy==1.22
  - slycot
  - ./my_local_pip/
  - ./requirements.txt
labels:
  foo: bar
  fizz: ${mopy.sbom}
project: my-python-app/

So, is your image really distroless?

Thanks to new tools for creating container images like multi-stage builds and BuildKit, it is now a lot more practical to create images that only contain the required software and its runtime dependencies. 

However, many images claiming to be distroless still include a shell (usually Bash) and/or BusyBox, which provides many of the commands a Linux distribution does — including wget — that can leave containers vulnerable to Living off the land (LOTL) attacks. This raises the question, “Why would an image trying to be distroless still include key parts of a Linux distribution?” The answer typically involves container initialization. 

Developers often have to make their applications configurable to meet the needs of their users. Most of the time, those configurations are not known at build time so they need to be configured at run time. Often, these configurations are applied using shell initialization scripts, which in turn depend on common Linux utilities such as sed, grep, cp, etc. When this is the case, the shell and utilities are only needed for the first few seconds of the container’s lifetime. Luckily, there is a way to create true distroless images while still allowing initialization using tools available from most container orchestrators: init containers.

Init containers

In Kubernetes, an init container is a container that starts and must complete successfully before the primary container can start. By using a non-distroless container as an init container that shares a volume with the primary container, the runtime environment and application can be configured before the application starts. 

The lifetime of that init container is short (often just a couple seconds), and it typically doesn’t need to be exposed to the internet. Much like multi-stage builds allow developers to separate the build-time dependencies from the runtime dependencies, init containers allow developers to separate initialization dependencies from the execution dependencies. 

The concept of init container may be familiar if you are using relational databases, where an init container is often used to perform schema migration before a new version of an application is started.

Kubernetes example

Here are two examples of using init containers. First, using Kubernetes:

apiVersion: v1
kind: Pod
metadata:
  name: kubecon-postgress-pod
  labels:
    app.kubernetes.io/name: KubeConPostgress
spec:
  containers:
  - name: postgress
    image: laurentgoderre689/postgres-distroless
    securityContext:
      runAsUser: 70
      runAsGroup: 70
    volumeMounts:
    - name: db
      mountPath: /var/lib/postgresql/data/
  initContainers:
  - name: init-postgress
    image: postgres:alpine3.18
    env:
      - name: POSTGRES_PASSWORD
        valueFrom:
          secretKeyRef:
            name: kubecon-postgress-admin-pwd
            key: password
    command: ['docker-ensure-initdb.sh']
    volumeMounts:
    - name: db
      mountPath: /var/lib/postgresql/data/
  volumes:
  - name: db
    emptyDir: {}

- - - 

> kubectl apply -f pod.yml && kubectl get pods
pod/kubecon-postgress-pod created
NAME                    READY   STATUS     RESTARTS   AGE
kubecon-postgress-pod   0/1     Init:0/1   0          0s
> kubectl get pods
NAME                    READY   STATUS    RESTARTS   AGE
kubecon-postgress-pod   1/1     Running   0          10s

Docker Compose example

The init container concept can also be emulated in Docker Compose for local development using service dependencies and conditions.

services:
 db:
   image: laurentgoderre689/postgres-distroless
   user: postgres
   volumes:
     - pgdata:/var/lib/postgresql/data/
   depends_on:
     db-init:
       condition: service_completed_successfully

 db-init:
   image: postgres:alpine3.18
   environment:
      POSTGRES_PASSWORD: example
   volumes:
     - pgdata:/var/lib/postgresql/data/
   user: postgres
    command: docker-ensure-initdb.sh

volumes:
 pgdata:

- - - 
> docker-compose up 
[+] Running 4/0
 ✔ Network compose_default      Created                                                                                                                      
 ✔ Volume "compose_pgdata"      Created                                                                                                                     
 ✔ Container compose-db-init-1  Created                                                                                                                      
 ✔ Container compose-db-1       Created                                                                                                                      
Attaching to db-1, db-init-1
db-init-1  | The files belonging to this database system will be owned by user "postgres".
db-init-1  | This user must also own the server process.
db-init-1  | 
db-init-1  | The database cluster will be initialized with locale "en_US.utf8".
db-init-1  | The default database encoding has accordingly been set to "UTF8".
db-init-1  | The default text search configuration will be set to "english".
db-init-1  | [...]
db-init-1 exited with code 0
db-1       | 2024-02-23 14:59:33.191 UTC [1] LOG:  starting PostgreSQL 16.1 on aarch64-unknown-linux-musl, compiled by gcc (Alpine 12.2.1_git20220924-r10) 12.2.1 20220924, 64-bit
db-1       | 2024-02-23 14:59:33.191 UTC [1] LOG:  listening on IPv4 address "0.0.0.0", port 5432
db-1       | 2024-02-23 14:59:33.191 UTC [1] LOG:  listening on IPv6 address "::", port 5432
db-1       | 2024-02-23 14:59:33.194 UTC [1] LOG:  listening on Unix socket "/var/run/postgresql/.s.PGSQL.5432"
db-1       | 2024-02-23 14:59:33.196 UTC [9] LOG:  database system was shut down at 2024-02-23 14:59:32 UTC
db-1       | 2024-02-23 14:59:33.198 UTC [1] LOG:  database system is ready to accept connections

As demonstrated by the previous example, an init container can be used alongside a container to remove the need for general-purpose software and allow the creation of true distroless images. 

Conclusion

This article explained how Docker build tools allow for the separation of build-time dependencies from run-time dependencies to create “distroless” images. For example, using init containers allows developers to separate the logic needed to configure a runtime environment from the environment itself and provide a more secure container. This approach also helps teams focus their efforts on the software they use and find a better balance between security and usability.

Learn more

💾

Don't miss out! Join us at our next Flagship Conference: KubeCon + CloudNativeCon North America in Salt Lake City from November 12 - 15, 2024. Connect with o...

How to Use OpenPubkey to SSH Without SSH Keys

This post was contributed by BastionZero.

What if you could SSH without having to worry about SSH keys? Without the need to worry about SSH keys getting lost, stolen, shared, rotated, or forgotten? In this article, we’ll walk you through how to SSH to your remote Docker setups with just your email account or Single Sign-On (SSO). Find instructions for setting up OpenPubkey SSH in our documentation.

banner How to Use OpenPubkey to SSH Without SSH Keys 2400x1260px

What’s wrong with SSH?

We love SSH and use it all the time, but don’t often stop to count how many keys we’ve accumulated over the years. As of writing this, I have eight. I can tell you what five of them are for, I definitely shouldn’t have at least two of them, and I’m pretty sure of the swift firing that would happen if I lost at least one other. What on earth is “is_key.pem”? I have no idea, and it sounds like I didn’t know when I made it.

There’s rarely an SSH key that’s actually harmless, even if you’re only using it to access or debug remote Docker setups. Test environments get cryptojacked and proxyjacked frequently, and entire swaths of the internet are dedicated to SSH hacking. 

When was the last time you patched sshd? The tool is ubiquitous yet so rarely updated that those threats are not going away anytime soon. Managing keys is a hassle that is bound to lead to compromise, and simple mistakes can lead to horrible outcomes. Even GitHub exposed their SSH private key in a public repository last year. 

So, what can we do? How can we do better? And is it free? Yes, yes, and yes. 

Now, there’s a new way to use SSH with OpenPubkey. Instead of juggling SSH keys, OpenPubkey SSH (OPK SSH) allows you to use your regular email account or SSO to log in and securely connect to an SSH server with a quick, one-time setup. No more guessing which keys get you fired, and no cursing your past self for poor naming conventions. No keys.

OpenPubkey SSH is the first fully developed use case for OpenPubkey, an open source project led by BastionZero, Docker, and The Linux Foundation. It will continue to grow and improve as we enhance its features and adapt it to meet evolving user needs and security challenges. Read on to learn what OpenPubkey is and how it works.

Getting started with OpenPubkey SSH 

Currently, OPK SSH only supports logging in via Google. If you have a particular provider you’d prefer, come visit us in GitHub or learn more in the Getting involved section below.

OpenPubkey SSH is being offered as part of BastionZero’s zero-trust command-line utility: the zli. Instructions for installing the zli can be found in the BastionZero documentation.

After installing the zli, you’ll need to:

  1. Configure your SSH server (<1 minute)
  2. Log in with Google (<1 minute)
  3. Test your configuration
  4. Use OPK SSH for Docker remote access
  5. Manage users

Configure your SSH server

The first step is to configure your SSH server. For your first-time setup, we assume you have a Google account and at least sudoer access to the SSH server you’re trying to set up.

zli configure opk <your Google email> <user>@<hostname>

Log in with Google

Then, you need to log in. This will open a browser window so you can authenticate with Google:

zli login --opk

Test your configuration

Now, you can use SSH using OPK. To test that everything configured correctly and access is working via OPK SSH, you can run the following command:

ssh -F /dev/null -o IdentityFile=~/.ssh/id_ecdsa -o IdentitiesOnly=yes user@server_ip

Because we save our certificate at a default location, SSH will always use it to authenticate. So, it is not necessary to specify the IdentityFile after removing your existing SSH keys.

Use OPK SSH for Docker remote access

If you’re already using SSH with Docker then you’re all set, you get to keep your existing remote Docker setup with no need to do anything else. Otherwise, you can set your local Docker client to connect to a remote Docker instance by doing one of the following:

# Set an environment variable
$ export DOCKER_HOST=ssh://user@server-ip

# Or, create a new context
$ docker context create ssh-box --docker "host=ssh://user@server-ip"

Then you can use Docker as usual, and it will use SSH under the hood to connect to your remote Docker instance.

Manage users

Now that you’ve set it up for one user, let’s discuss how to configure it for many. OPK SSH means that you don’t have to coordinate with users to give them access. Who you choose to allow access to your server is specified in an easy-to-read YAML policy file that might look like this:

$ cat policy.yaml
users:
    - email: alice@acme.co
      principals:
        - root
        - luffy
    - email: bob@co.acme
      principals:
        - luffy

Note that principals is SSH-speak for the users you’re allowed to SSH in as.

If you’re flying solo or in a small group, then you’ll likely never have to deal with this file directly; our zli configuration command takes care of this for you. However, larger groups may be more interested in how this works at scale, and we’ve got answers for you. To discuss how OPK SSH can specifically fit your needs, reach out to us at BastionZero. For any issues or troubleshooting questions during the process, visit our guide.

How it works

Docker already lets you use SSH to execute Docker commands on remote containers by specifying a different host either as an environment variable or as part of a context.

# Set an environment variable
$ export DOCKER_HOST=ssh://user@server-ip

# Or, create a new context
$ docker context create ssh-box --docker "host=ssh://user@server-ip"

For OPK SSH, you don’t need to change any of that. Docker is using your pre-configured SSH under the hood for you. OpenPubkey is a different configuration that’s more secure yet completely compatible with Docker or any other access use case that relies on SSH (Figure 1).

 Illustration showing overview of Docker Client, SSH Client, SSO, Docker Host, and OPK verifier.
Figure 1: Accessing a container using OpenPubkey SSH.

OpenPubkey slides in nicely with how SSH is already designed. We only use integration mechanisms that are well-used and widely deployed. First, we use SSH certificates instead of SSH keys, and second, we use the AuthorizedKeysCommand to invoke the OpenPubkey verifier program. This is all taken care of for you by our zli configure command.

$ cat /etc/ssh/sshd_config
...
AuthorizedKeysCommand /etc/opk/opk-ssh verify %u %k %t
AuthorizedKeysCommandUser root
...

SSH certificates remove the need for any keys. Instead of using them as in a traditional certificate ecosystem, such as x509, our goal is to embed them with a special token that we can verify on the server. That’s where the AuthorizedKeysCommand comes in. 

The AuthorizedKeysCommand allows users to have their access evaluated by a program instead of by comparing it against preconfigured, public keys in an authorized_keys file. Once you’ve configured your sshd to use our OPK verifier, it can grant or deny access for all OPK-generated SSH certificates you give it going forward.

What is OpenPubkey?

OpenPubkey isn’t just about SSH; it is so much more. Docker is using it to sign Docker Official Images and BastionZero is using it for zero-trust infrastructure access. OpenPubkey is a joint effort between the Linux Foundation, BastionZero, and Docker. It is an open source project built on top of OpenID Connect (OIDC) that adds new functionality without impacting any of the old. 

OIDC is a protocol that lets you log into websites or applications using your personal (or work) email accounts. When you log in, you’re actually generating an identity token (ID token) that’s only for the specific application and that attests to the fact that you’re you. It also includes some handy personal information — essentially whatever you’ve given that application permission to request. 

Basically, OpenPubkey adds a temporary public key to your ID token so that you can sign messages. Because it’s attested to by trusted identity providers like Google, Microsoft, Okta, etc., anyone can verify it anywhere, at any time.

But OpenPubkey isn’t just about adding a public key to your ID token; it’s also about how you use it. One issue with vanilla OIDC is that any application that respects that token assumes you are you. With OpenPubkey, proving that you’re you isn’t just about presenting a public token, but also a single-use, signed message. So, the only way to impersonate you is to steal your public token and a private secret that never leaves your machine.  

Getting involved

There are plenty of ways to get involved. We’re building a passionate and engaged community. We discuss things at both a high level for those who like to architect and at a fun, gritty, technical level for those who like to be a different kind of architect. Come to hang out; we appreciate the support in whatever capacity you can provide.

If you’d like to get involved, visit our OpenPubkey repo. And if you’re ready to try OPK SSH to SSH without SSH keys, refer to our documentation’s comprehensive guide.

Learn more

Security Advisory: High Severity Curl Vulnerability

Editor’s note: Following the release of curl 8.4.0, this post was updated on October 11, 2023 to add more detail about the vulnerability and information on how to use Docker Scout to remediate this issue should you discover a dependency on an affected version of curl.


The maintainers of curl, the popular command-line tool and library for transferring data with URLs, released curl 8.4.0 on October 11, 2023. This version includes a fix for two common vulnerabilities and exposures (CVEs), one of which the curl maintainers rate as “HIGH” severity and described as “probably the worst curl security flaw in a long time.” 

The CVE IDs are: 

  • CVE-2023-38545: SOCKS5 heap buffer overflow, severity HIGH (affects both libcurl and the curl tool)
  • CVE-2023-38546: Cookie injection with none file, severity LOW (affects libcurl only, not the tool)

Details on how these CVEs are exploited are published along with the advisory. But curl maintainer, Daniel Stenberg, also published a blog post with more detail about how the vulnerability came about through the specific implementation of support for SOCKS5.

This post explains how you can use Docker Scout to understand if you have a dependency on curl in your container images. We’ll also provide guidance on where the dependency was introduced and how to update curl to 8.4.0.   

Black padlock on light blue digital background

Am I vulnerable?

Having a dependency on curl won’t necessarily mean the exploit will be possible for your application. But Docker Scout can help explain if your images have a dependency on curl, how the CVE is exploitable, and how to upgrade to the latest version (should you have a dependency or exploitable implementation).  

Quickest way to assess all images 

The quickest way to assess all images is to enable Docker Scout for your container registry. 

Step 1: Enable Docker Scout

Docker Scout currently supports Docker Hub, JFrog Artifactory, and AWS Elastic Container Registry. Instructions for integrating Docker Scout with these container registries:

Note: If your container registry isn’t supported right now, you’ll need to use the local evaluation method via the CLI, described later.

Step 2: Select the repositories you want to analyze and kick off an analysis

Docker Scout analyzes all local images by default, but to analyze images in remote repositories, you need to enable Docker Scout image analysis. You can do this from Docker Hub, the Docker Scout Dashboard, and CLI. Find out how in the overview guide.

  1. Sign in to your Docker account with the docker login command or use the Sign in button in Docker Desktop.
  2. Use the Docker CLI docker scout repo enable command to enable analysis on an existing repository:
$ docker scout repo enable --org <org-name> <org-name>/scout-demo

Step 3: Visit scout.docker.com 

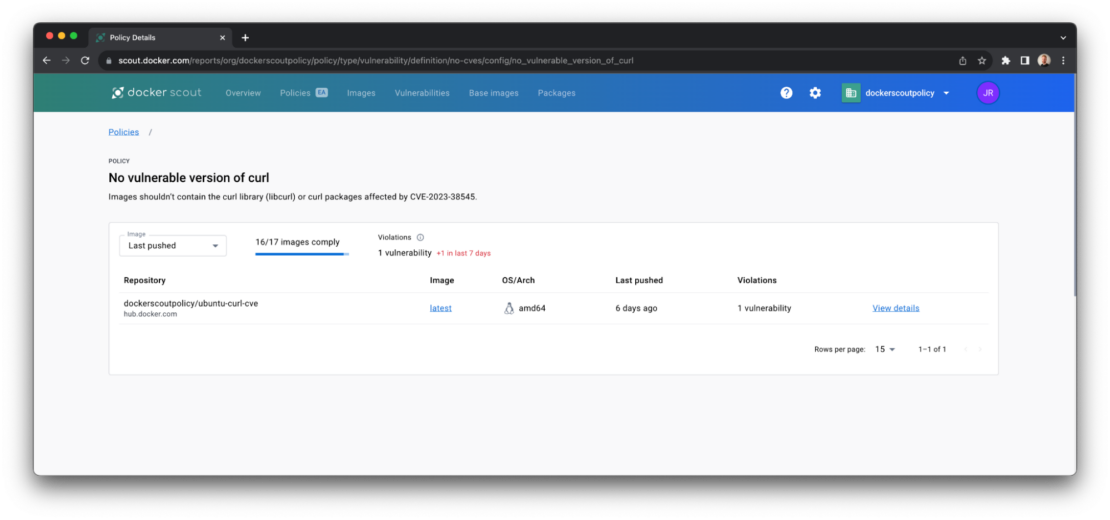
On the scout.docker.com homepage, find the policy card called No vulnerable version of curl and select View details (Figure 1). 

curl scout figure1
Figure 1: Docker Scout dashboard with the policy card that will help identify if and where the vulnerable version of curl exists.

The resulting list contains all the images that violate this policy — that is, they contain a version of curl that is likely to be susceptible to the HIGH severity CVE (CVE-2023-38545) listed above.

scout policy no vulnerable version curl
Figure 2: Docker Scout showing list of images that violate the policy by containing affected versions of the curl library.

Step 4: Identify where the curl dependency is introduced

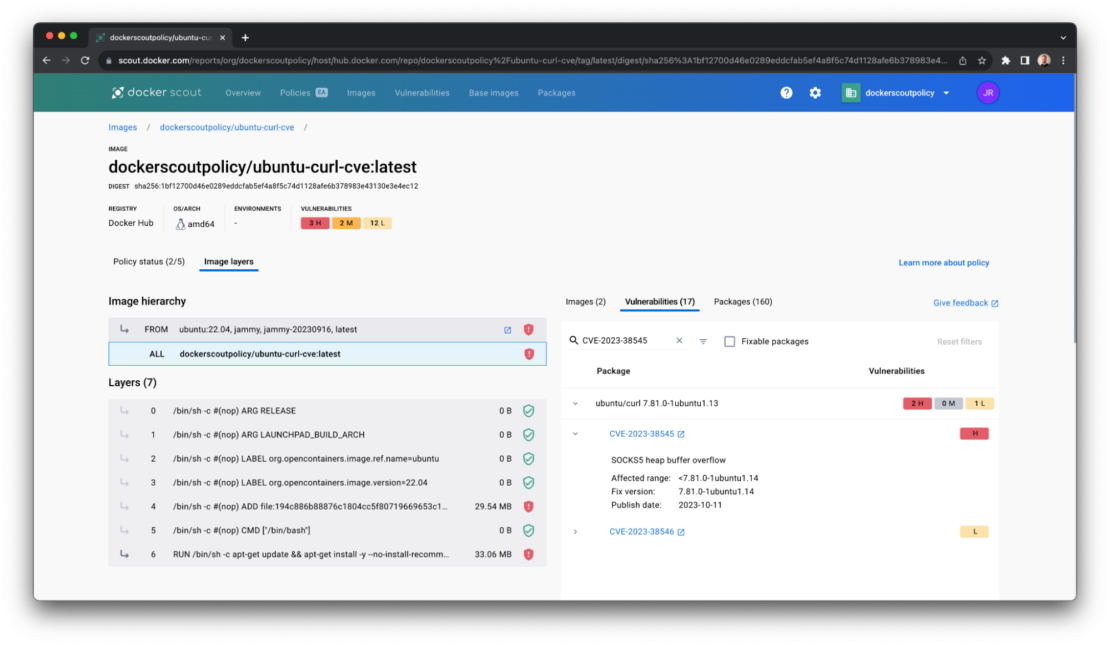
For each of the images in the list that fail to meet the “No vulnerable versions of curl” policy, click on the tag (eg “latest”) to open the layer view.

The layer view breaks down the composition of your container image to help you understand where the vulnerable version of curl is being introduced.

Typically, this will be in one of two places: the base image that you’re image builds on top of or in an application where libcurl is introduced as a package dependency.

scout policy image screenshot
Figure 3: Docker Scout showing the base image layer that introduces the vulnerable version of curl.

Step 5: Choose your remediation path

The results in the image layer view will determine your first course of action. But since curl is distributed in most OS base images, you’ll probably want to start by updating the base image.

If your image uses the latest base image tag, you can kick off a new build (either locally or in your pipeline), push the new image into your registry, and return to Step 3.

If, having returned to Step 3, you still see policy violations and warnings on the base image layers, this may be due to the upstream maintainers still working on updating curl versions. 

If, having returned to Step 3, you still see policy violations and warnings on the application layers, you’ll need to manually bump the version of curl your application code has a dependency on, then build and push again.

Alternative CLI method

Step 1: Evaluate the container image

An alternative method is to use the Docker Scout CLI to analyze and evaluate local container images.

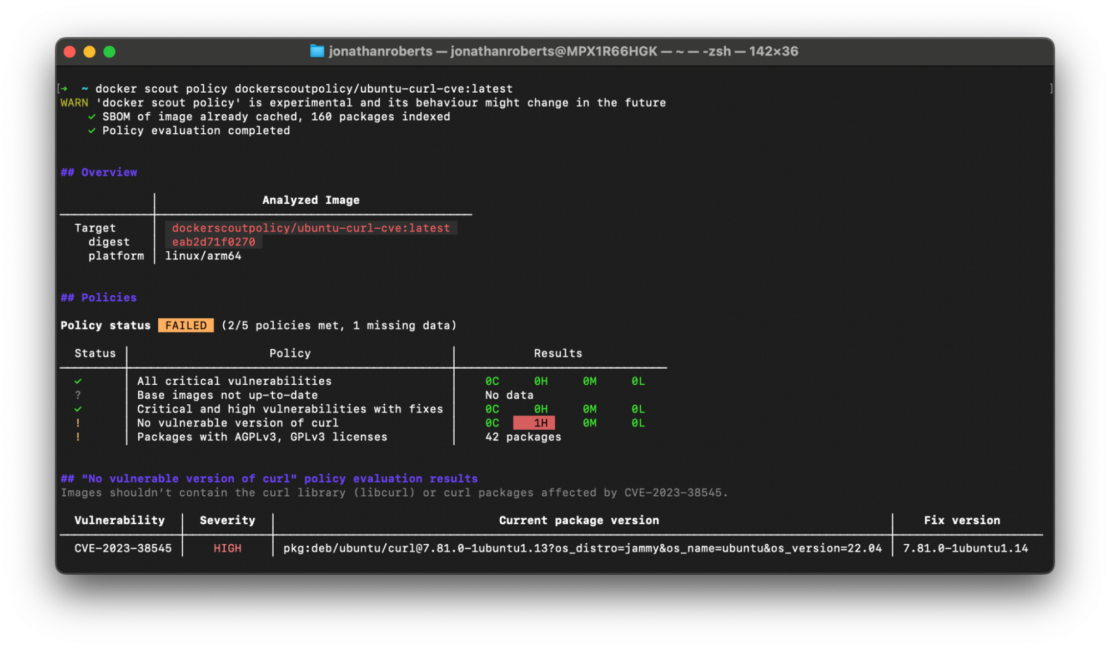
You can use the docker scout policy command to evaluate images against Docker Scout’s built-in policies on the command line, including the No vulnerable version of curl

docker scout policy [IMAGE] --org [ORG]
scout results container image evaluation
Figure 4: Docker Scout showing the results of running the Docker Scout command to evaluate a container image against the ‘No vulnerable version of curl’ policy.

If you’d rather understand all the CVEs identified in an individual container image, you can run the following command. This method doesn’t require you to enable Docker Scout in your container registry but will take a little longer if you have a large number of images to analyze. 

docker scout cves [OPTIONS] [IMAGE|DIRECTORY|ARCHIVE]

Step 2: View recommendations

You can use Docker Scout recommendations to understand which remediation paths are available. More specifically, you can discover what base image updates will remove known vulnerabilities.

docker scout recommendations [IMAGE]
scout reccommendations command results
Figure 5: Docker Scout showing results of the docker scout recommendations command. Note that some upstream content providers may not have yet published fixes to their stable builds. You may want to consider moving to bleeding-edge versions.

Learn more

❌