Vue lecture
Docker Desktop 4.42: Native IPv6, Built-In MCP, and Better Model Packaging
Docker Desktop 4.42 introduces powerful new capabilities that enhance network flexibility, improve security, and deepen AI toolchain integration, all while reducing setup friction. With native IPv6 support, a fully integrated MCP Toolkit, and major upgrades to Docker Model Runner and our AI agent Gordon, this release continues our commitment to helping developers move faster, ship smarter, and build securely across any environment. Whether you’re managing enterprise-grade networks or experimenting with agentic workflows, Docker Desktop 4.42 brings the tools you need right into your development workflows.
IPv6 support
Docker Desktop now provides IPv6 networking capabilities with customization options to better support diverse network environments. You can now choose between dual IPv4/IPv6 (default), IPv4-only, or IPv6-only networking modes to align with your organization’s network requirements. The new intelligent DNS resolution behavior automatically detects your host’s network stack and filters unsupported record types, preventing connectivity timeouts in IPv4-only or IPv6-only environments.
These ipv6 settings are available in Docker Desktop Settings > Resources > Network section and can be enforced across teams using Settings Management, making Docker Desktop more reliable in complex enterprise network configurations including IPv6-only deployments.
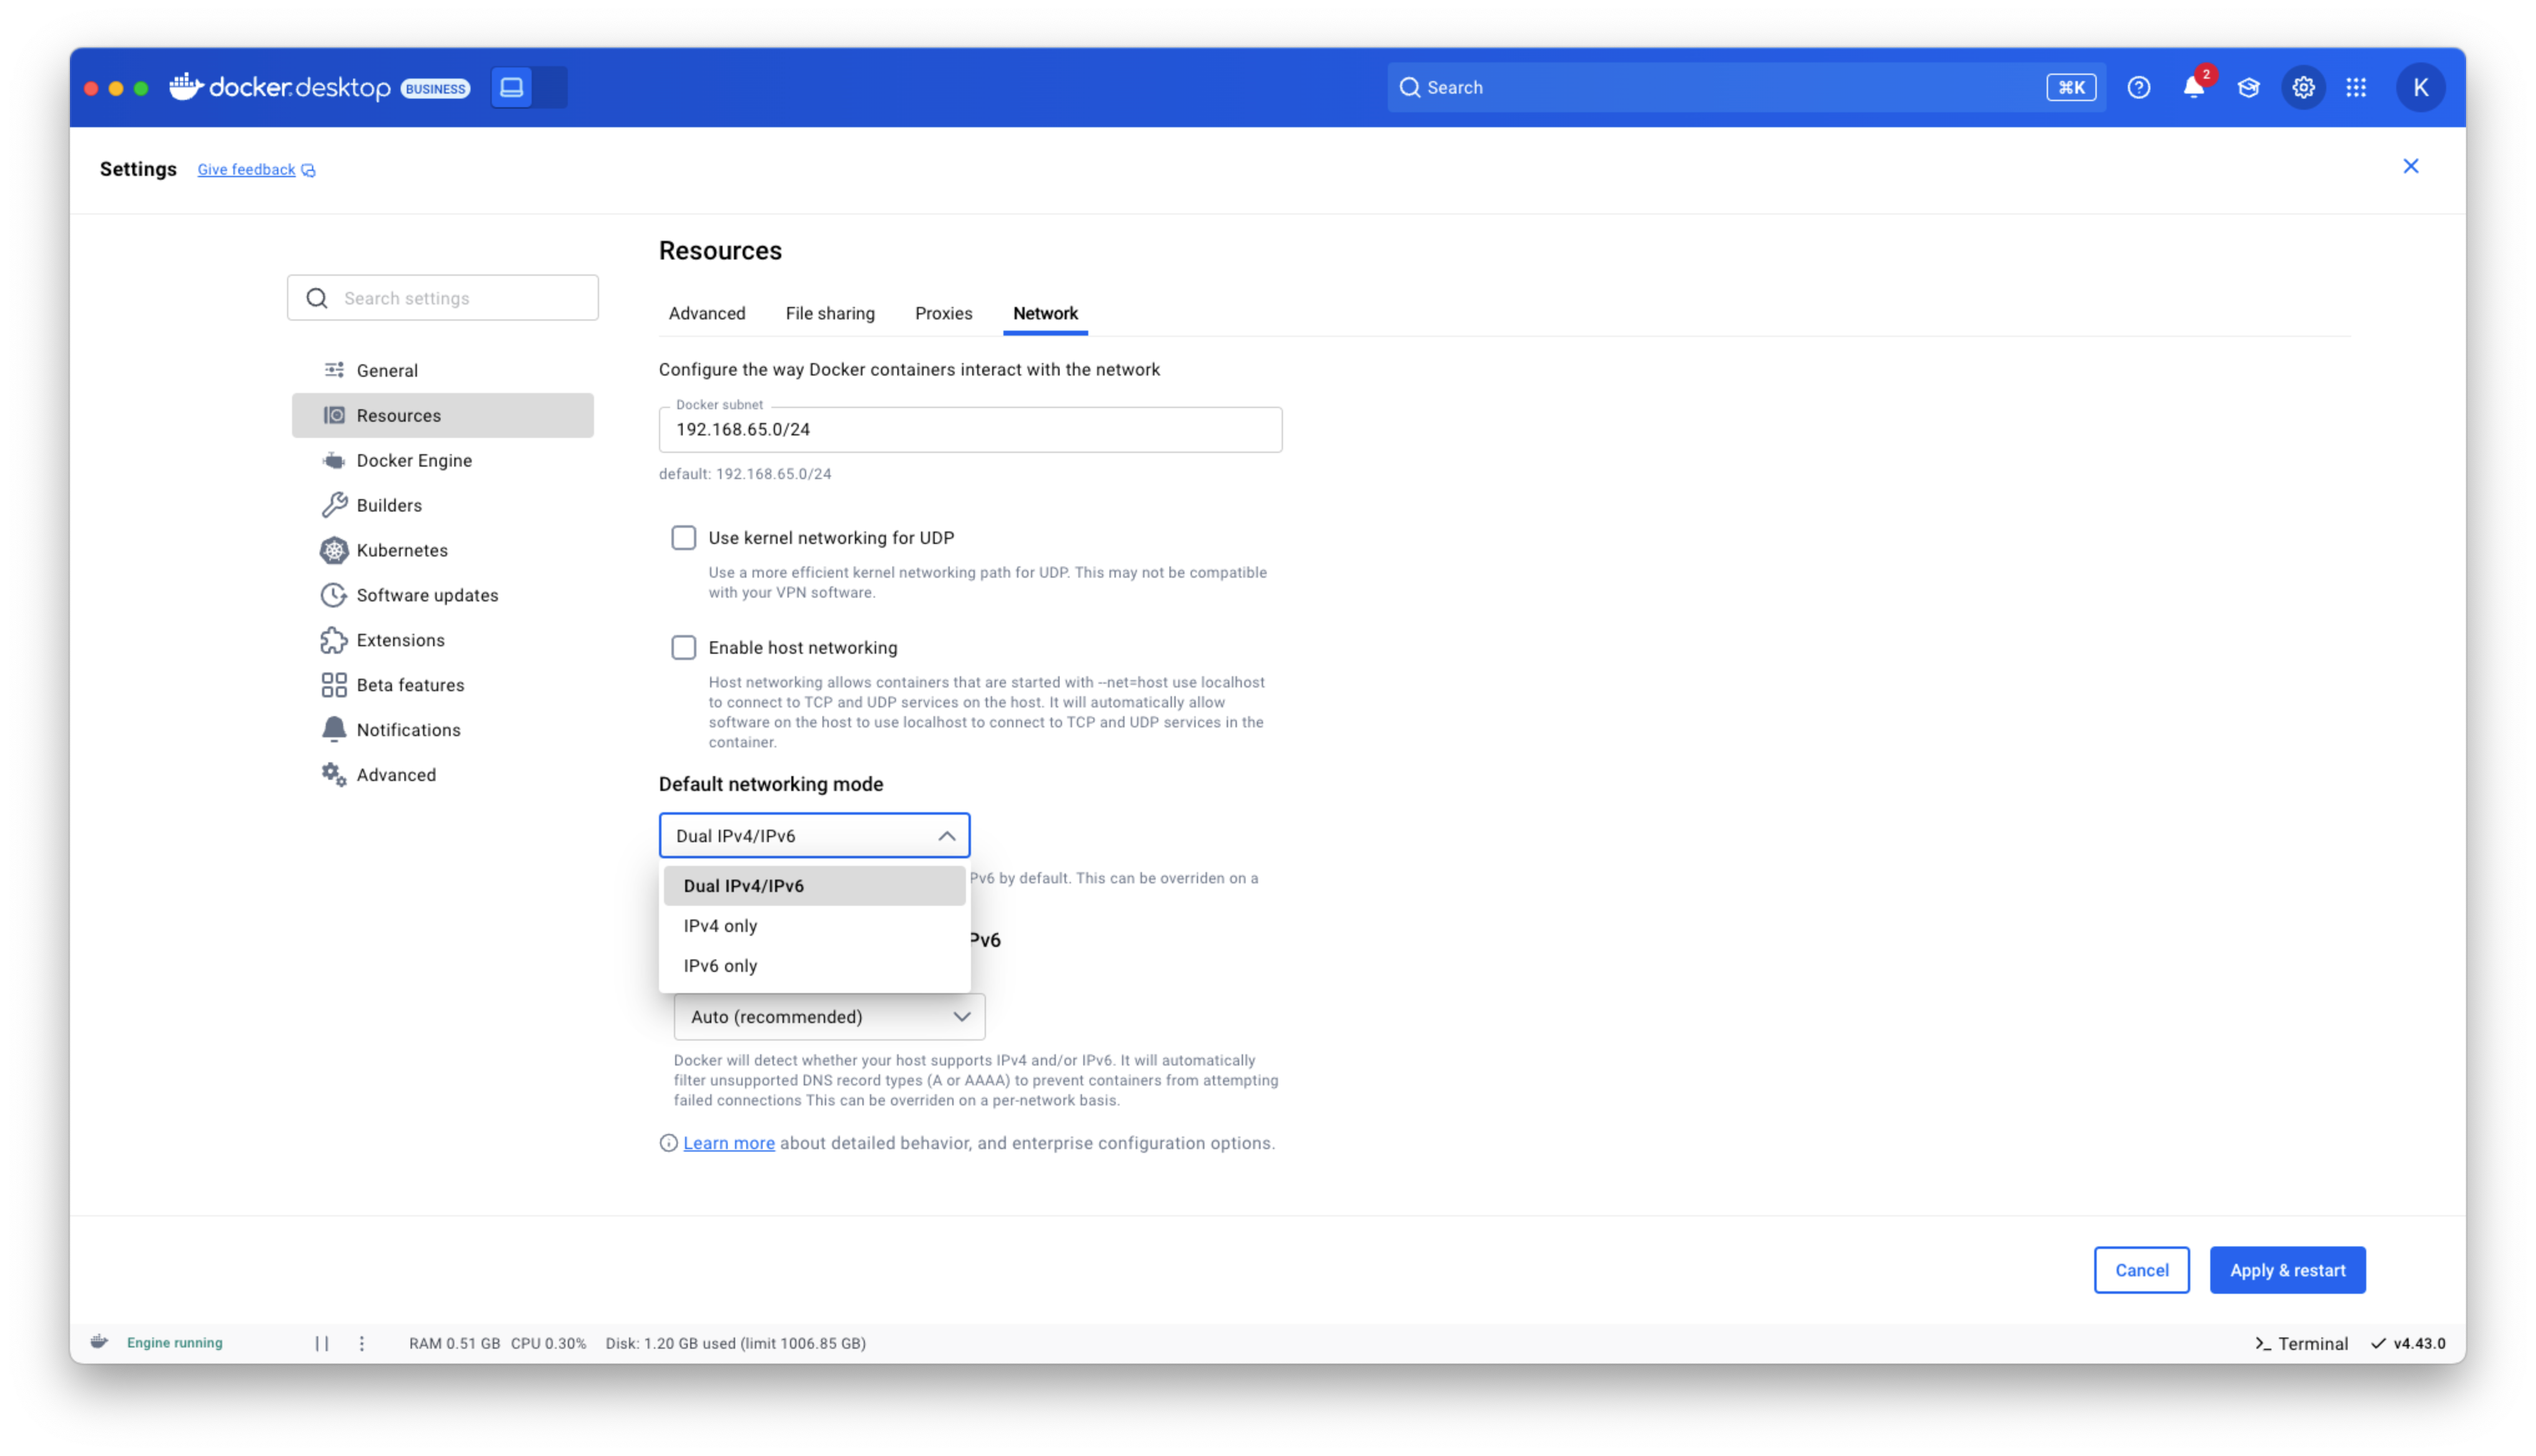
Figure 1: Docker Desktop IPv6 settings
Docker MCP Toolkit integrated into Docker Desktop
Last month, we launched the Docker MCP Catalog and Toolkit to help developers easily discover MCP servers and securely connect them to their favorite clients and agentic apps. We’re humbled by the incredible support from the community. User growth is up by over 50%, and we’ve crossed 1 million pulls! Now, we’re excited to share that the MCP Toolkit is built right into Docker Desktop, no separate extension required.
You can now access more than 100 MCP servers, including GitHub, MongoDB, Hashicorp, and more, directly from Docker Desktop – just enable the servers you need, configure them, and connect to clients like Claude Desktop, Cursor, Continue.dev, or Docker’s AI agent Gordon.
Unlike typical setups that run MCP servers via npx or uvx processes with broad access to the host system, Docker Desktop runs these servers inside isolated containers with well-defined security boundaries. All container images are cryptographically signed, with proper isolation of secrets and configuration data.
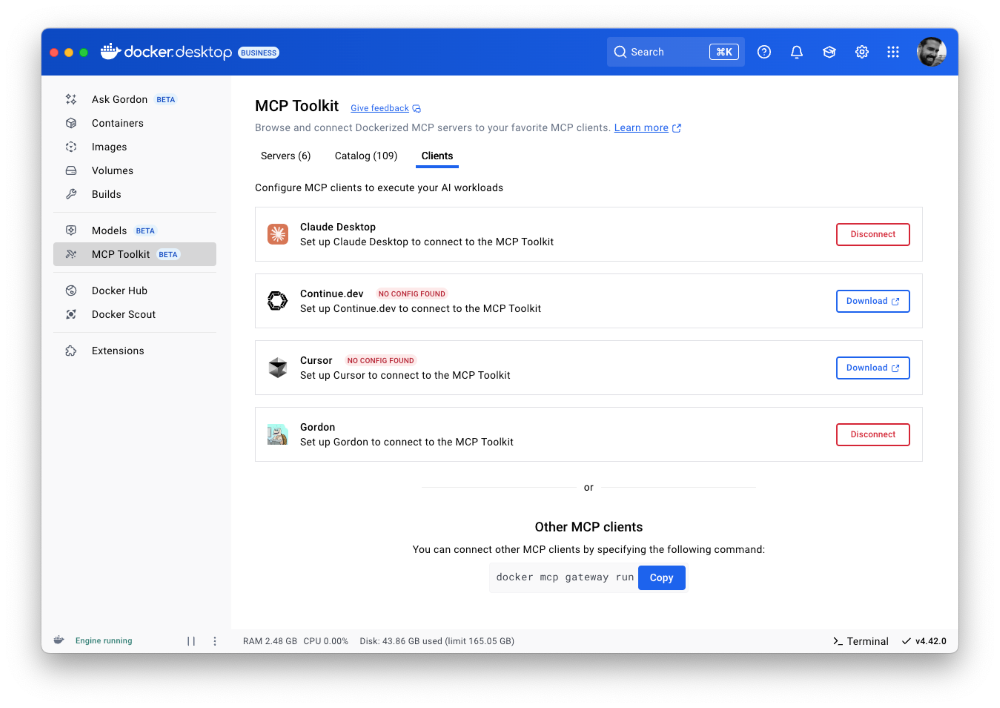
Figure 2: Docker MCP Toolkit is now integrated natively into Docker Desktop
To meet developers where they are, we’re bringing Docker MCP support to the CLI, using the same command structure you’re already familiar with. With the new docker mcp commands, you can launch, configure, and manage MCP servers directly from the terminal. The CLI plugin offers comprehensive functionality, including catalog management, client connection setup, and secret management.
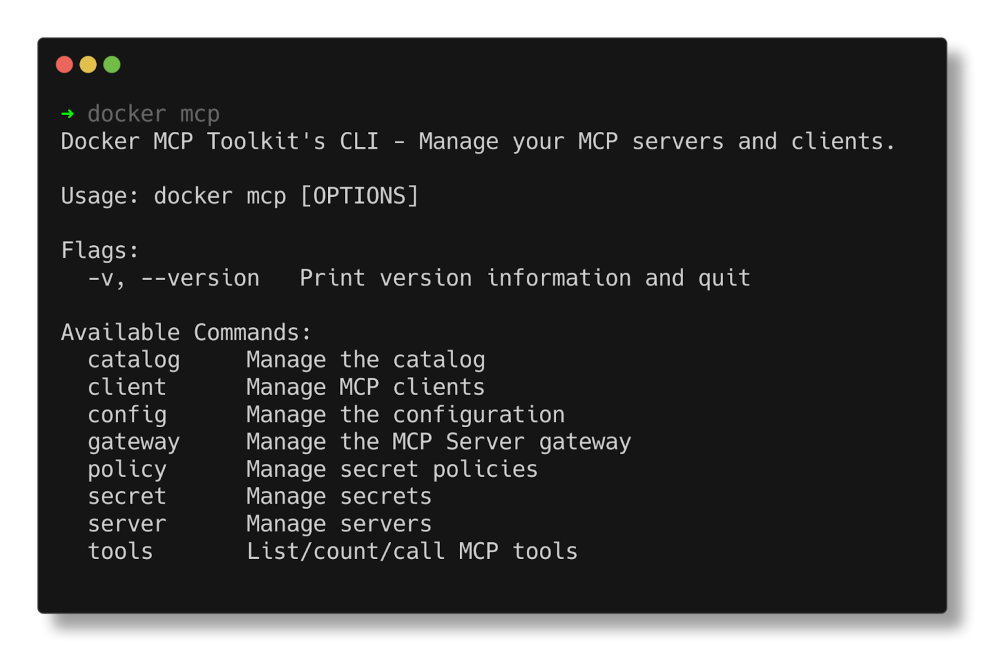
Figure 3: Docker MCP CLI commands.
Docker AI Agent Gordon Now Supports MCP Toolkit Integration
In this release, we’ve upgraded Gordon, Docker’s AI agent, with direct integration to the MCP Toolkit in Docker Desktop. To enable it, open Gordon, click the “Tools” button, and toggle on the “MCP” Toolkit option. Once activated, the MCP Toolkit tab will display tools available from any MCP servers you’ve configured.
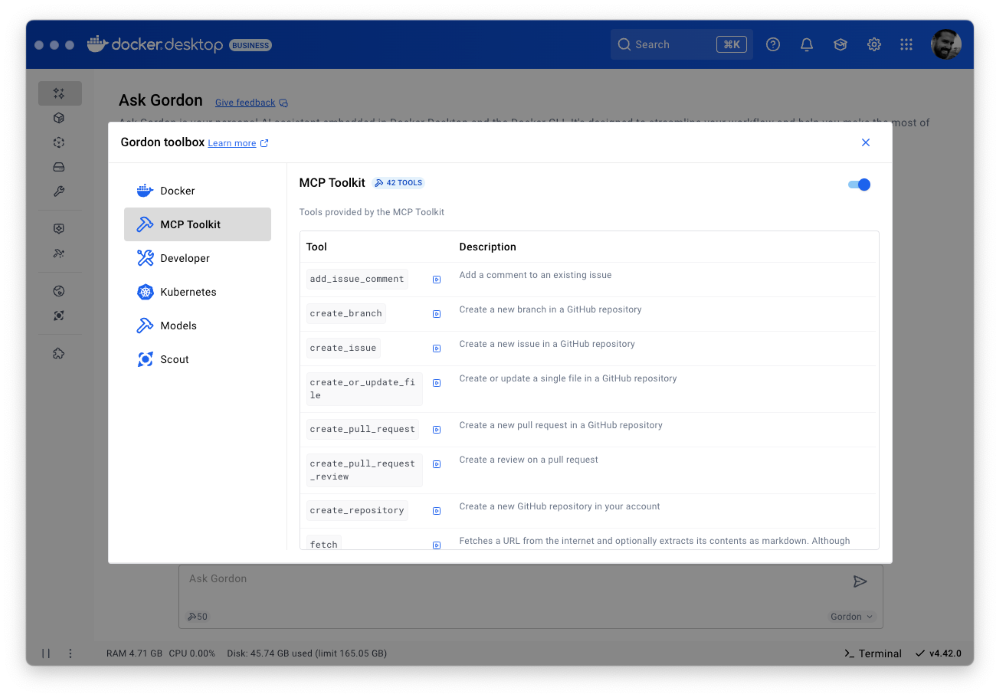
Figure 4: Docker’s AI Agent Gordon now integrates with Docker’s MCP Toolkit, bringing 100+ MCP servers
This integration gives you immediate access to 100+ MCP servers with no extra setup, letting you experiment with AI capabilities directly in your Docker workflow. Gordon now acts as a bridge between Docker’s native tooling and the broader AI ecosystem, letting you leverage specialized tools for everything from screenshot capture to data analysis and API interactions – all from a consistent, unified interface.
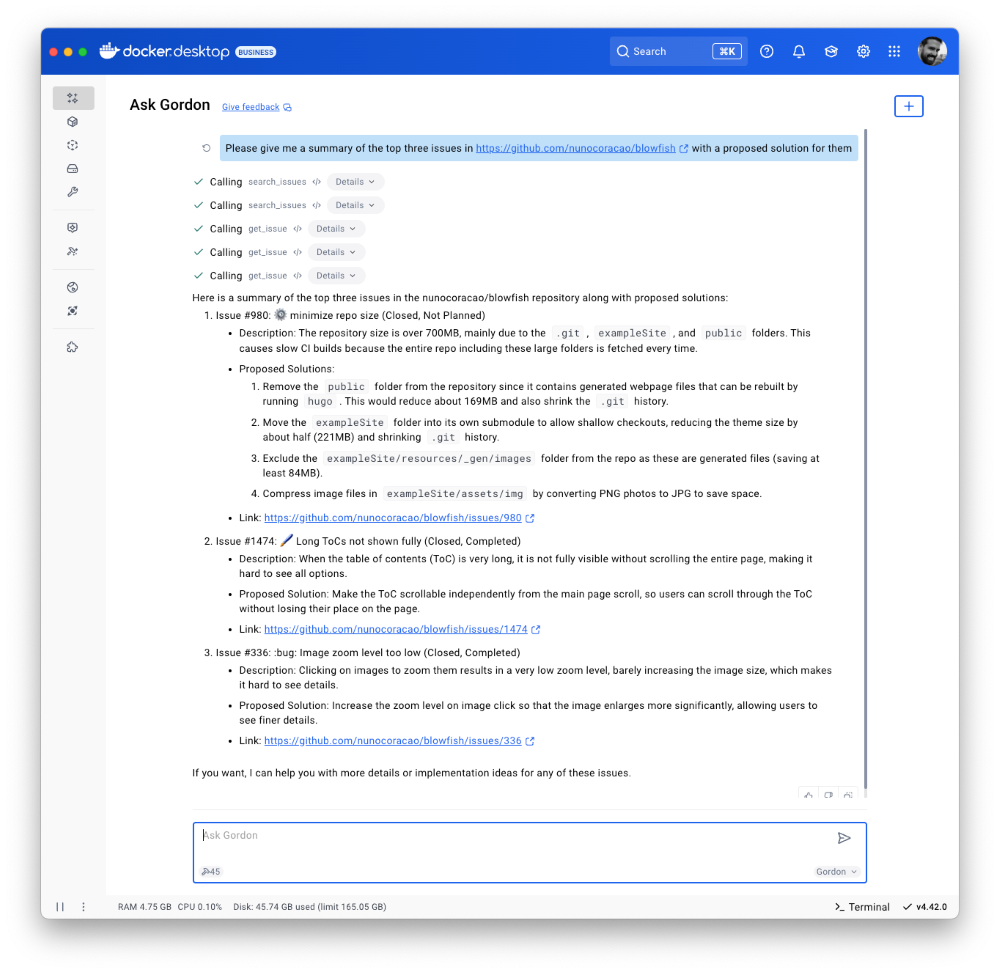
Figure 5: Docker’s AI Agent Gordon uses the GitHub MCP server to pull issues and suggest solutions.
Finally, we’ve also improved the Dockerize feature with expanded support for Java, Kotlin, Gradle, and Maven projects. These improvements make it easier to containerize a wider range of applications with minimal configuration. With expanded containerization capabilities and integrated access to the MCP Toolkit, Gordon is more powerful than ever. It streamlines container workflows, reduces repetitive tasks, and gives you access to specialized tools, so you can stay focused on building, shipping, and running your applications efficiently.
Docker Model Runner adds Qualcomm support, Docker Engine Integration, and UX Upgrades
Staying true to our philosophy of giving developers more flexibility and meeting them where they are, the latest version of Docker Model Runner adds broader OS support, deeper integration with popular Docker tools, and improvements in both performance and usability.
In addition to supporting Apple Silicon and Windows systems with NVIDIA GPUs, Docker Model Runner now works on Windows devices with Qualcomm chipsets. Under the hood, we’ve upgraded our inference engine to use the latest version of llama.cpp, bringing significantly enhanced tool calling capabilities to your AI applications.Docker Model Runner can now be installed directly in Docker Engine Community Edition across multiple Linux distributions supported by Docker Engine. This integration is particularly valuable for developers looking to incorporate AI capabilities into their CI/CD pipelines and automated testing workflows. To get started, check out our documentation for the setup guide.
Get Up and Running with Models Faster
The Docker Model Runner user experience has been upgraded with expanded GUI functionality in Docker Desktop. All of these UI enhancements are designed to help you get started with Model Runner quickly and build applications faster. A dedicated interface now includes three new tabs that simplify model discovery, management, and streamline troubleshooting workflows. Additionally, Docker Desktop’s updated GUI introduces a more intuitive onboarding experience with streamlined “two-click” actions.
After clicking on the Model tab, you’ll see three new sub-tabs. The first, labeled “Local,” displays a set of models in various sizes that you can quickly pull. Once a model is pulled, you can launch a chat interface to test and experiment with it immediately.
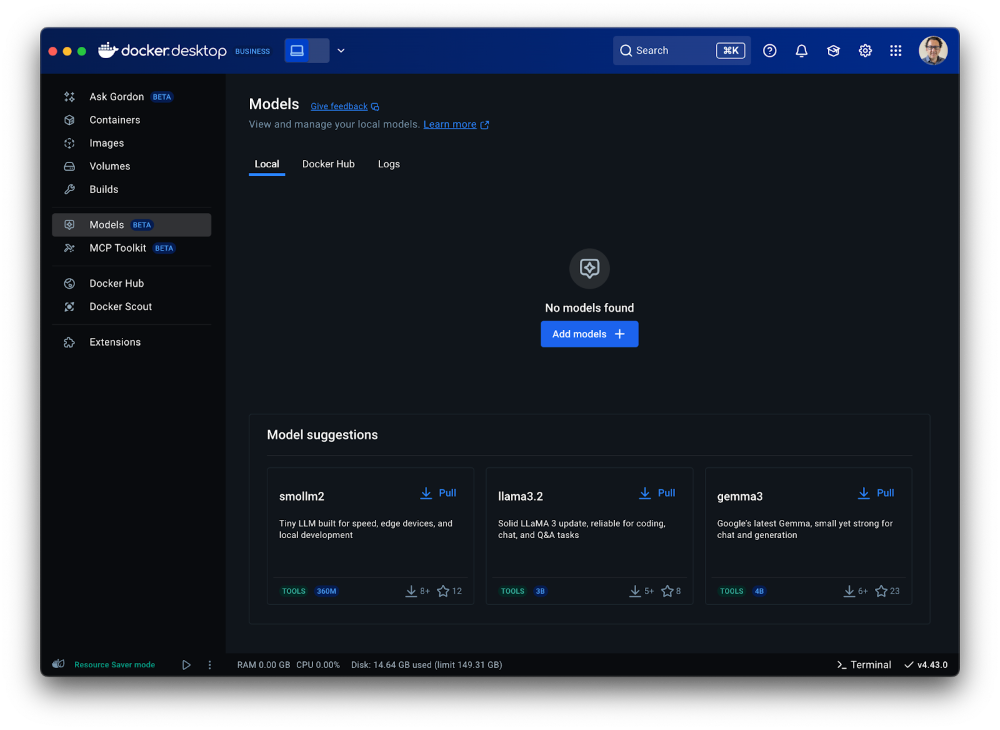
Figure 6: Access a set of models of various sizes to get quickly started in Models menu of Docker Desktop
The second tab ”Docker Hub” offers a comprehensive view for browsing and pulling models from Docker Hub’s AI Catalog, making it easy to get started directly within Docker Desktop, without switching contexts.
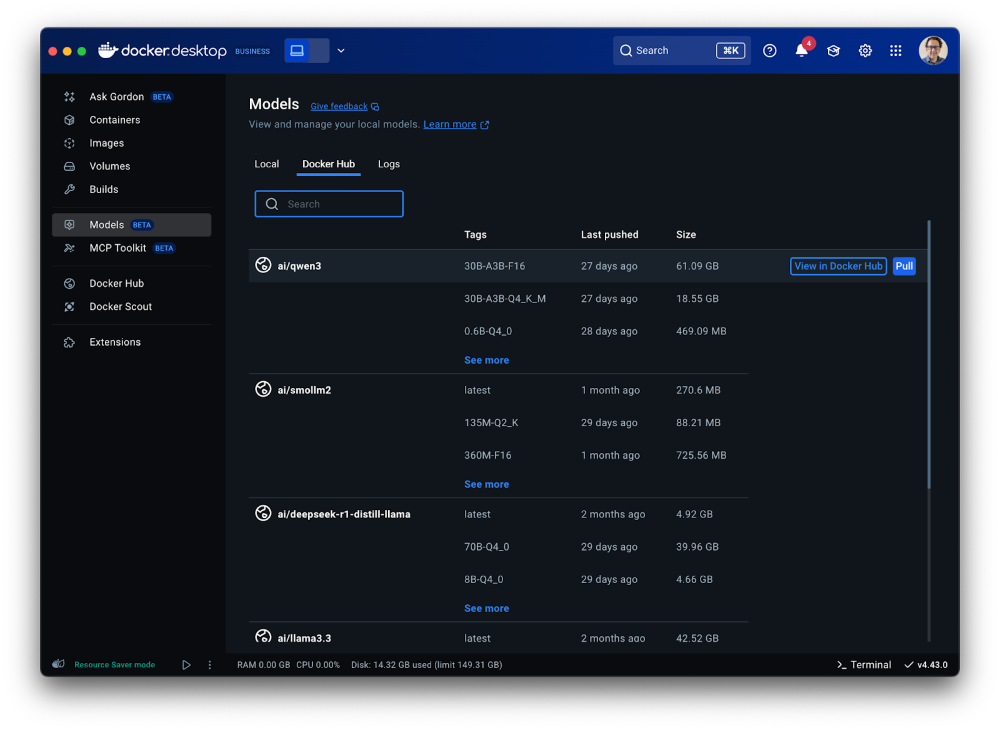
Figure 7: A shortcut to the Model catalog from Docker Hub in Models menu of Docker Desktop
The third tab “Logs” offers real-time access to the inference engine’s log tail, giving developers immediate visibility into model execution status and debugging information directly within the Docker Desktop interface.

Figure 8: Gain visibility into model execution status and debugging information in Docker Desktop
Model Packaging Made Simple via CLI
As part of the Docker Model CLI, the most significant enhancement is the introduction of the docker model package command. This new command enables developers to package their models from GGUF format into OCI-compliant artifacts, fundamentally transforming how AI models are distributed and shared. It enables seamless publishing to both public and private and OCI-compatible repositories such as Docker Hub and establishes a standardized, secure workflow for model distribution, using the same trusted Docker tools developers already rely on. See our docs for more details.
Conclusion
From intelligent networking enhancements to seamless AI integrations, Docker Desktop 4.42 makes it easier than ever to build with confidence. With native support for IPv6, in-app access to 100+ MCP servers, and expanded platform compatibility for Docker Model Runner, this release is all about meeting developers where they are and equipping them with the tools to take their work further. Update to the latest version today and unlock everything Docker Desktop 4.42 has to offer.
Learn more
- Authenticate and update today to receive your subscription level’s newest Docker Desktop features.
- Subscribe to the Docker Navigator Newsletter.
- Learn about our sign-in enforcement options.
- New to Docker? Create an account.
- Have questions? The Docker community is here to help.
Docker Desktop 4.41: Docker Model Runner supports Windows, Compose, and Testcontainers integrations, Docker Desktop on the Microsoft Store
Big things are happening in Docker Desktop 4.41! Whether you’re building the next AI breakthrough or managing development environments at scale, this release is packed with tools to help you move faster and collaborate smarter. From bringing Docker Model Runner to Windows (with NVIDIA GPU acceleration!), Compose and Testcontainers, to new ways to manage models in Docker Desktop, we’re making AI development more accessible than ever. Plus, we’ve got fresh updates for your favorite workflows — like a new Docker DX Extension for Visual Studio Code, a speed boost for Mac users, and even a new location for Docker Desktop on the Microsoft Store. Also, we’re enabling ACH transfer as a payment option for self-serve customers. Let’s dive into what’s new!
Docker Model Runner now supports Windows, Compose & Testcontainers
This release brings Docker Model Runner to Windows users with NVIDIA GPU support. We’ve also introduced improvements that make it easier to manage, push, and share models on Docker Hub and integrate with familiar tools like Docker Compose and Testcontainers. Docker Model Runner works with Docker Compose projects for orchestrating model pulls and injecting model runner services, and Testcontainers via its libraries. These updates continue our focus on helping developers build AI applications faster using existing tools and workflows.
In addition to CLI support for managing models, Docker Desktop now includes a dedicated “Models” section in the GUI. This gives developers more flexibility to browse, run, and manage models visually, right alongside their containers, volumes, and images.

Figure 1: Easily browse, run, and manage models from Docker Desktop
Further extending the developer experience, you can now push models directly to Docker Hub, just like you would with container images. This creates a consistent, unified workflow for storing, sharing, and collaborating on models across teams. With models treated as first-class artifacts, developers can version, distribute, and deploy them using the same trusted Docker tooling they already use for containers — no extra infrastructure or custom registries required.
docker model push <model>
The Docker Compose integration makes it easy to define, configure, and run AI applications alongside traditional microservices within a single Compose file. This removes the need for separate tools or custom configurations, so teams can treat models like any other service in their dev environment.
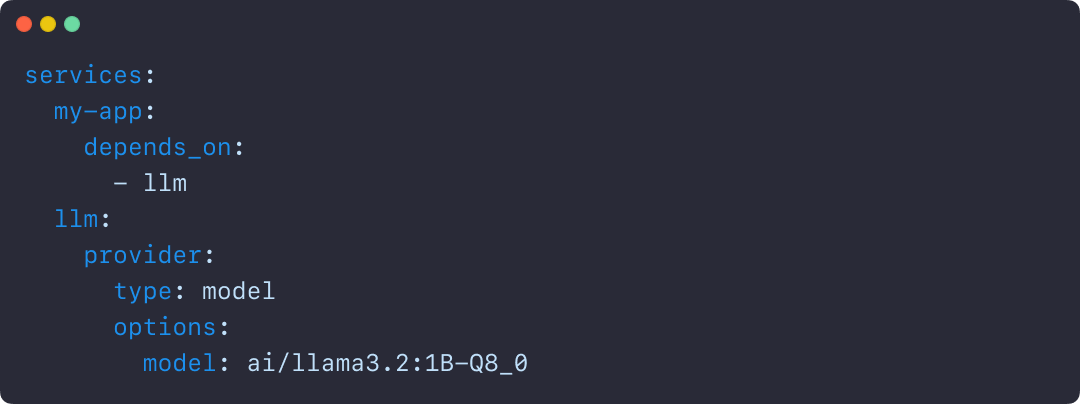
Figure 2: Using Docker Compose to declare services, including running AI models
Similarly, the Testcontainers integration extends testing to AI models, with initial support for Java and Go and more languages on the way. This allows developers to run applications and create automated tests using AI services powered by Docker Model Runner. By enabling full end-to-end testing with Large Language Models, teams can confidently validate application logic, their integration code, and drive high-quality releases.
String modelName = "ai/gemma3";
DockerModelRunnerContainer modelRunnerContainer = new DockerModelRunnerContainer()
       .withModel(modelName);
modelRunnerContainer.start();


OpenAiChatModel model = OpenAiChatModel.builder()
       .baseUrl(modelRunnerContainer.getOpenAIEndpoint())
       .modelName(modelName)
       .logRequests(true)
       .logResponses(true)
       .build();


String answer = model.chat("Give me a fact about Whales.");
System.out.println(answer);
Docker DX Extension in Visual Studio: Catch issues early, code with confidence
The Docker DX Extension is now live on the Visual Studio Marketplace. This extension streamlines your container development workflow with rich editing, linting features, and built-in vulnerability scanning. You’ll get inline warnings and best-practice recommendations for your Dockerfiles, powered by Build Check — a feature we introduced last year.
It also flags known vulnerabilities in container image references, helping you catch issues early in the dev cycle. For Bake files, it offers completion, variable navigation, and inline suggestions based on your Dockerfile stages. And for those managing complex Docker Compose setups, an outline view makes it easier to navigate and understand services at a glance.

Figure 3: Docker DX Extension in Visual Studio provides actionable recommendations for fixing vulnerabilities and optimizing Dockerfiles
Read more about this in our announcement blog and GitHub repo. Get started today by installing Docker DX – Visual Studio Marketplace
MacOS QEMU virtualization option deprecation
The QEMU virtualization option in Docker Desktop for Mac will be deprecated on July 14, 2025.
With the new Apple Virtualization Framework, you’ll experience improved performance, stability, and compatibility with macOS updates as well as tighter integration with Apple Silicon architecture.
What this means for you:
- If you’re using QEMU as your virtualization backend on macOS, you’ll need to switch to either Apple Virtualization Framework (default) or Docker VMM (beta) options.
- This does NOT affect QEMU’s role in emulating non-native architectures for multi-platform builds.
- Your multi-architecture builds will continue to work as before.
For complete details, please see our official announcement.
Introducing Docker Desktop in the Microsoft Store
Docker Desktop is now available for download from the Microsoft Store! We’re rolling out an EXE-based installer for Docker Desktop on Windows. This new distribution channel provides an enhanced installation and update experience for Windows users while simplifying deployment management for IT administrators across enterprise environments.
Key benefits
For developers:
- Automatic Updates: The Microsoft Store handles all update processes automatically, ensuring you’re always running the latest version without manual intervention.
- Streamlined Installation: Experience a more reliable setup process with fewer startup errors.
- Simplified Management: Manage Docker Desktop alongside your other applications in one familiar interface.
For IT admins:
- Native Intune MDM Integration: Deploy Docker Desktop across your organization with Microsoft’s native management tools.
- Centralized Deployment Control: Roll out Docker Desktop more easily through the Microsoft Store’s enterprise distribution channels.
- Automatic Updates Regardless of Security Settings: Updates are handled automatically by the Microsoft Store infrastructure, even in organizations where users don’t have direct store access.
- Familiar Process: The update mechanism maps to the widget command, providing consistency with other enterprise software management tools.
This new distribution option represents our commitment to improving the Docker experience for Windows users while providing enterprise IT teams with the management capabilities they need.
Unlock greater flexibility: Enable ACH transfer as a payment option for self-serve customers
We’re focused on making it easier for teams to scale, grow, and innovate. All on their own terms. That’s why we’re excited to announce an upgrade to the self-serve purchasing experience: customers can pay via ACH transfer starting on 4/30/25.
Historically, self-serve purchases were limited to credit card payments, forcing many customers who could not use credit cards into manual sales processes, even for small seat expansions. With the introduction of an ACH transfer payment option, customers can choose the payment method that works best for their business. Fewer delays and less unnecessary friction.
This payment option upgrade empowers customers to:
- Purchase more independently without engaging sales
- Choose between credit card or ACH transfer with a verified bank account
By empowering enterprises and developers, we’re freeing up your time, and ours, to focus on what matters most: building, scaling, and succeeding with Docker.
Visit our documentation to explore the new payment options, or log in to your Docker account to get started today!
Wrapping up
With Docker Desktop 4.41, we’re continuing to meet developers where they are — making it easier to build, test, and ship innovative apps, no matter your stack or setup. Whether you’re pushing AI models to Docker Hub, catching issues early with the Docker DX Extension, or enjoying faster virtualization on macOS, these updates are all about helping you do your best work with the tools you already know and love. We can’t wait to see what you build next!
Learn more
- Authenticate and update today to receive your subscription level’s newest Docker Desktop features.
- Subscribe to the Docker Navigator Newsletter.
- Learn about our sign-in enforcement options.
- New to Docker? Create an account.
- Have questions? The Docker community is here to help.
Docker Model Runner: The Missing Piece for Your GenAI Development Workflow
How to Dockerize a Django App: Step-by-Step Guide for Beginners
One of the best ways to make sure your web apps work well in different environments is to containerize them. Containers let you work in a more controlled way, which makes development and deployment easier. This guide will show you how to containerize a Django web app with Docker and explain why it’s a good idea.
We will walk through creating a Docker container for your Django application. Docker gives you a standardized environment, which makes it easier to get up and running and more productive. This tutorial is aimed at those new to Docker who already have some experience with Django. Let’s get started!
Why containerize your Django application?
Django apps can be put into containers to help you work more productively and consistently. Here are the main reasons why you should use Docker for your Django project:
- Creates a stable environment: Containers provide a stable environment with all dependencies installed, so you don’t have to worry about “it works on my machine” problems. This ensures that you can reproduce the app and use it on any system or server. Docker makes it simple to set up local environments for development, testing, and production.
- Ensures reproducibility and portability: A Dockerized app bundles all the environment variables, dependencies, and configurations, so it always runs the same way. This makes it easier to deploy, especially when you’re moving apps between environments.
- Facilitates collaboration between developers: Docker lets your team work in the same environment, so there’s less chance of conflicts from different setups. Shared Docker images make it simple for your team to get started with fewer setup requirements.
- Speeds up deployment processes: Docker makes it easier for developers to get started with a new project quickly. It removes the hassle of setting up development environments and ensures everyone is working in the same place, which makes it easier to merge changes from different developers.
Getting started with Django and Docker
Setting up a Django app in Docker is straightforward. You don’t need to do much more than add in the basic Django project files.
Tools you’ll need
To follow this guide, make sure you first:
- Install Docker Desktop and Docker Compose on your machine.
- Use a Docker Hub account to store and access Docker images.
- Make sure Django is installed on your system.
If you need help with the installation, you can find detailed instructions on the Docker and Django websites.
How to Dockerize your Django project
The following six steps include code snippets to guide you through the process.
Step 1: Set up your Django project
1. Initialize a Django project.
If you don’t have a Django project set up yet, you can create one with the following commands:
django-admin startproject my_docker_django_app
cd my_docker_django_app
2. Create a requirements.txt file.
In your project, create a requirements.txt file to store dependencies:
pip freeze > requirements.txt
3. Update key environment settings.
You need to change some sections in the settings.py file to enable them to be set using environment variables when the container is started. This allows you to change these settings depending on the environment you are working in.
  # The secret key
  SECRET_KEY = os.environ.get("SECRET_KEY")

  DEBUG = bool(os.environ.get("DEBUG", default=0))

  ALLOWED_HOSTS = os.environ.get("DJANGO_ALLOWED_HOSTS","127.0.0.1").split(",")
Step 2: Create a Dockerfile
A Dockerfile is a script that tells Docker how to build your Docker image. Put it in the root directory of your Django project. Here’s a basic Dockerfile setup for Django:
# Use the official Python runtime image
FROM python:3.13

# Create the app directory
RUN mkdir /app

# Set the working directory inside the container
WORKDIR /app

# Set environment variables
# Prevents Python from writing pyc files to disk
ENV PYTHONDONTWRITEBYTECODE=1
#Prevents Python from buffering stdout and stderr
ENV PYTHONUNBUFFERED=1

# Upgrade pip
RUN pip install --upgrade pip

# Copy the Django project  and install dependencies
COPY requirements.txt  /app/

# run this command to install all dependencies
RUN pip install --no-cache-dir -r requirements.txt

# Copy the Django project to the container
COPY . /app/

# Expose the Django port
EXPOSE 8000

# Run Django’s development server
CMD ["python", "manage.py", "runserver", "0.0.0.0:8000"]
Each line in the Dockerfile serves a specific purpose:
FROM: Selects the image with the Python version you need.WORKDIR: Sets the working directory of the application within the container.ENV: Sets the environment variables needed to build the applicationRUNandCOPYcommands: Install dependencies and copy project files.EXPOSEandCMD: Expose the Django server port and define the startup command.
You can build the Django Docker container with the following command:
docker build -t django-docker .
To see your image, you can run:
docker image list
The result will look something like this:
REPOSITORY      TAG       IMAGE ID       CREATED          SIZE
django-docker   latest    ace73d650ac6   20 seconds ago   1.55GB
Although this is a great start in containerizing the application, you’ll need to make a number of improvements to get it ready for production.
- The CMD
manage.pyis only meant for development purposes and should be changed for a WSGI server. - Reduce the size of the image by using a smaller image.
- Optimize the image by using a multistage build process.
Let’s get started with these improvements.
Update requirements.txt
Make sure to add gunicorn to your requirements.txt. It should look like this:
asgiref==3.8.1
Django==5.1.3
sqlparse==0.5.2
gunicorn==23.0.0
psycopg2-binary==2.9.10
Make improvements to the Dockerfile
The Dockerfile below has changes that solve the three items on the list. The changes to the file are as follows:
- Updated the
FROM python:3.13image toFROM python:3.13-slim. This change reduces the size of the image considerably, as the image now only contains what is needed to run the application. - Added a multi-stage build process to the Dockerfile. When you build applications, there are usually many files left on the file system that are only needed during build time and are not needed once the application is built and running. By adding a build stage, you use one image to build the application and then move the built files to the second image, leaving only the built code. Read more about multi-stage builds in the documentation.
- Add the Gunicorn WSGI server to the server to enable a production-ready deployment of the application.
# Stage 1: Base build stage
FROM python:3.13-slim AS builder

# Create the app directory
RUN mkdir /app

# Set the working directory
WORKDIR /app

# Set environment variables to optimize Python
ENV PYTHONDONTWRITEBYTECODE=1
ENV PYTHONUNBUFFERED=1

# Upgrade pip and install dependencies
RUN pip install --upgrade pip

# Copy the requirements file first (better caching)
COPY requirements.txt /app/

# Install Python dependencies
RUN pip install --no-cache-dir -r requirements.txt

# Stage 2: Production stage
FROM python:3.13-slim

RUN useradd -m -r appuser && \
   mkdir /app && \
   chown -R appuser /app

# Copy the Python dependencies from the builder stage
COPY --from=builder /usr/local/lib/python3.13/site-packages/ /usr/local/lib/python3.13/site-packages/
COPY --from=builder /usr/local/bin/ /usr/local/bin/

# Set the working directory
WORKDIR /app

# Copy application code
COPY --chown=appuser:appuser . .

# Set environment variables to optimize Python
ENV PYTHONDONTWRITEBYTECODE=1
ENV PYTHONUNBUFFERED=1

# Switch to non-root user
USER appuser

# Expose the application port
EXPOSE 8000

# Start the application using Gunicorn
CMD ["gunicorn", "--bind", "0.0.0.0:8000", "--workers", "3", "my_docker_django_app.wsgi:application"]
Build the Docker container image again.
docker build -t django-docker .
After making these changes, we can run a docker image list again:
REPOSITORY      TAG       IMAGE ID       CREATED         SIZE
django-docker   latest    3c62f2376c2c   6 seconds ago   299MB
You can see a significant improvement in the size of the container.
The size was reduced from 1.6 GB to 299MB, which leads to faster a deployment process when images are downloaded and cheaper storage costs when storing images.
You could use docker init as a command to generate the Dockerfile and compose.yml file for your application to get you started.
Step 3: Configure the Docker Compose file
A compose.yml file allows you to manage multi-container applications. Here, we’ll define both a Django container and a PostgreSQL database container.
The compose file makes use of an environment file called .env, which will make it easy to keep the settings separate from the application code. The environment variables listed here are standard for most applications:
services:
 db:
   image: postgres:17
   environment:
     POSTGRES_DB: ${DATABASE_NAME}
     POSTGRES_USER: ${DATABASE_USERNAME}
     POSTGRES_PASSWORD: ${DATABASE_PASSWORD}
   ports:
     - "5432:5432"
   volumes:
     - postgres_data:/var/lib/postgresql/data
   env_file:
     - .env

 django-web:
   build: .
   container_name: django-docker
   ports:
     - "8000:8000"
   depends_on:
     - db
   environment:
     DJANGO_SECRET_KEY: ${DJANGO_SECRET_KEY}
     DEBUG: ${DEBUG}
     DJANGO_LOGLEVEL: ${DJANGO_LOGLEVEL}
     DJANGO_ALLOWED_HOSTS: ${DJANGO_ALLOWED_HOSTS}
     DATABASE_ENGINE: ${DATABASE_ENGINE}
     DATABASE_NAME: ${DATABASE_NAME}
     DATABASE_USERNAME: ${DATABASE_USERNAME}

     DATABASE_PASSWORD: ${DATABASE_PASSWORD}
     DATABASE_HOST: ${DATABASE_HOST}
     DATABASE_PORT: ${DATABASE_PORT}
   env_file:
     - .env
volumes:
   postgres_data:
And the example .env file:
DJANGO_SECRET_KEY=your_secret_key
DEBUG=True
DJANGO_LOGLEVEL=info
DJANGO_ALLOWED_HOSTS=localhost
DATABASE_ENGINE=postgresql_psycopg2
DATABASE_NAME=dockerdjango
DATABASE_USERNAME=dbuser
DATABASE_PASSWORD=dbpassword
DATABASE_HOST=db
DATABASE_PORT=5432
Step 4: Update Django settings and configuration files
1. Configure database settings.
Update settings.py to use PostgreSQL:
  DATABASES = {
       'default': {
           'ENGINE': 'django.db.backends.{}'.format(
               os.getenv('DATABASE_ENGINE', 'sqlite3')
           ),
           'NAME': os.getenv('DATABASE_NAME', 'polls'),
           'USER': os.getenv('DATABASE_USERNAME', 'myprojectuser'),
           'PASSWORD': os.getenv('DATABASE_PASSWORD', 'password'),
           'HOST': os.getenv('DATABASE_HOST', '127.0.0.1'),
           'PORT': os.getenv('DATABASE_PORT', 5432),
       }
   }
2. Set ALLOWED_HOSTS to read from environment files.
In settings.py, set ALLOWED_HOSTS to:
   # 'DJANGO_ALLOWED_HOSTS' should be a single string of hosts with a , between each.
   # For example: 'DJANGO_ALLOWED_HOSTS=localhost 127.0.0.1,[::1]'
   ALLOWED_HOSTS = os.environ.get("DJANGO_ALLOWED_HOSTS","127.0.0.1").split(",")
3. Set the SECRET_KEY to read from environment files.
In settings.py, set SECRET_KEY to:
   # SECURITY WARNING: keep the secret key used in production secret!
   SECRET_KEY = os.environ.get("DJANGO_SECRET_KEY")
4. Set DEBUG to read from environment files.
In settings.py, set DEBUG to:
 # SECURITY WARNING: don't run with debug turned on in production!
 DEBUG = bool(os.environ.get("DEBUG", default=0))
Step 5: Build and run your new Django project
To build and start your containers, run:
docker compose up --build
This command will download any necessary Docker images, build the project, and start the containers. Once complete, your Django application should be accessible at http://localhost:8000.
Step 6: Test and access your application
Once the app is running, you can test it by navigating to http://localhost:8000. You should see Django’s welcome page, indicating that your app is up and running. To verify the database connection, try running a migration:
docker compose run django-web python manage.py migrate
Troubleshooting common issues with Docker and Django
Here are some common issues you might encounter and how to solve them:
- Database connection errors: If Django can’t connect to PostgreSQL, verify that your database service name matches in
compose.ymlandsettings.py. - File synchronization issues: Use the
volumesdirective incompose.ymlto sync changes from your local files to the container. - Container restart loops or crashes: Use
docker compose logsto inspect container errors and determine the cause of the crash.
Optimizing your Django web application
To improve your Django Docker setup, consider these optimization tips:
- Automate and secure builds: Use Docker’s multi-stage builds to create leaner images, removing unnecessary files and packages for a more secure and efficient build.
- Optimize database access: Configure database pooling and caching to reduce connection time and boost performance.
- Efficient dependency management: Regularly update and audit dependencies listed in
requirements.txtto ensure efficiency and security.
Take the next step with Docker and Django
Containerizing your Django application with Docker is an effective way to simplify development, ensure consistency across environments, and streamline deployments. By following the steps outlined in this guide, you’ve learned how to set up a Dockerized Django app, optimize your Dockerfile for production, and configure Docker Compose for multi-container setups.
Docker not only helps reduce “it works on my machine” issues but also fosters better collaboration within development teams by standardizing environments. Whether you’re deploying a small project or scaling up for enterprise use, Docker equips you with the tools to build, test, and deploy reliably.
Ready to take the next step? Explore Docker’s powerful tools, like Docker Hub and Docker Scout, to enhance your containerized applications with scalable storage, governance, and continuous security insights.
Learn more
- Subscribe to the Docker Newsletter.
- Learn more about Docker commands, Docker Compose, and security in the Docker Docs.
- Find Dockerized Django projects for inspiration and guidance in GitHub.
- Discover Docker plugins that improve performance, logging, and security.
- Get the latest release of Docker Desktop.
- Have questions? The Docker community is here to help.
- New to Docker? Get started.
Docker Best Practices: Using ARG and ENV in Your Dockerfiles
If you’ve worked with Docker for any length of time, you’re likely accustomed to writing or at least modifying a Dockerfile. This file can be thought of as a recipe for a Docker image; it contains both the ingredients (base images, packages, files) and the instructions (various RUN, COPY, and other commands that help build the image).
In most cases, Dockerfiles are written once, modified seldom, and used as-is unless something about the project changes. Because these files are created or modified on such an infrequent basis, developers tend to rely on only a handful of frequently used instructions — RUN, COPY, and EXPOSE being the most common. Other instructions can enhance your image, making it more configurable, manageable, and easier to maintain.
In this post, we will discuss the ARG and ENV instructions and explore why, how, and when to use them.

ARG: Defining build-time variables
The ARG instruction allows you to define variables that will be accessible during the build stage but not available after the image is built. For example, we will use this Dockerfile to build an image where we make the variable specified by the ARG instruction available during the build process.
FROM ubuntu:latest
ARG THEARG="foo"
RUN echo $THEARG
CMD ["env"]
If we run the build, we will see the echo foo line in the output:
$ docker build --no-cache -t argtest .
[+] Building 0.4s (6/6) FINISHED                                                                     docker:desktop-linux
<-- SNIP -->
 => CACHED [1/2] FROM docker.io/library/ubuntu:latest@sha256:8a37d68f4f73ebf3d4efafbcf66379bf3728902a8038616808f04e  0.0s
 => => resolve docker.io/library/ubuntu:latest@sha256:8a37d68f4f73ebf3d4efafbcf66379bf3728902a8038616808f04e34a9ab6  0.0s
 => [2/2] RUN echo foo                                                                                               0.1s
 => exporting to image                                                                                               0.0s
<-- SNIP -->
However, if we run the image and inspect the output of the env command, we do not see THEARG:
$ docker run --rm argtest
PATH=/usr/local/sbin:/usr/local/bin:/usr/sbin:/usr/bin:/sbin:/bin
HOSTNAME=d19f59677dcd
HOME=/root
ENV: Defining build and runtime variables
Unlike ARG, the ENV command allows you to define a variable that can be accessed both at build time and run time:
FROM ubuntu:latest
ENV THEENV="bar"
RUN echo $THEENV
CMD ["env"]
If we run the build, we will see the echo bar line in the output:
$ docker build -t envtest .
[+] Building 0.8s (7/7) FINISHED                                                                     docker:desktop-linux
<-- SNIP -->
 => CACHED [1/2] FROM docker.io/library/ubuntu:latest@sha256:8a37d68f4f73ebf3d4efafbcf66379bf3728902a8038616808f04e  0.0s
 => => resolve docker.io/library/ubuntu:latest@sha256:8a37d68f4f73ebf3d4efafbcf66379bf3728902a8038616808f04e34a9ab6  0.0s
 => [2/2] RUN echo bar                                                                                               0.1s
 => exporting to image                                                                                               0.0s
<-- SNIP -->
If we run the image and inspect the output of the env command, we do see THEENV set, as expected:
$ docker run --rm envtest
PATH=/usr/local/sbin:/usr/local/bin:/usr/sbin:/usr/bin:/sbin:/bin
HOSTNAME=f53f1d9712a9
THEENV=bar
HOME=/root
Overriding ARG
A more advanced use of the ARG instruction is to serve as a placeholder that is then updated at build time:
FROM ubuntu:latest
ARG THEARG
RUN echo $THEARG
CMD ["env"]
If we build the image, we see that we are missing a value for $THEARG:
$ docker build -t argtest .
<-- SNIP -->
 => CACHED [1/2] FROM docker.io/library/ubuntu:latest@sha256:8a37d68f4f73ebf3d4efafbcf66379bf3728902a8038616808f04e  0.0s
 => => resolve docker.io/library/ubuntu:latest@sha256:8a37d68f4f73ebf3d4efafbcf66379bf3728902a8038616808f04e34a9ab6  0.0s
 => [2/2] RUN echo $THEARG                                                                                           0.1s
 => exporting to image                                                                                               0.0s
 => => exporting layers                                                                                              0.0s
<-- SNIP -->
However, we can pass a value for THEARG on the build command line using the --build-arg argument. Notice that we now see THEARG has been replaced with foo in the output:
 => CACHED [1/2] FROM docker.io/library/ubuntu:latest@sha256:8a37d68f4f73ebf3d4efafbcf66379bf3728902a8038616808f04e  0.0s
 => => resolve docker.io/library/ubuntu:latest@sha256:8a37d68f4f73ebf3d4efafbcf66379bf3728902a8038616808f04e34a9ab6  0.0s
 => [2/2] RUN echo foo                                                                                               0.1s
 => exporting to image                                                                                               0.0s
 => => exporting layers                                                                                              0.0s
<-- SNIP -->
The same can be done in a Docker Compose file by using the args key under the build key. Note that these can be set as a mapping (THEARG: foo) or a list (- THEARG=foo):
services:
  argtest:
    build:
      context: .
      args:
        THEARG: foo
If we run docker compose up --build, we can see the THEARG has been replaced with foo in the output:
$ docker compose up --build
<-- SNIP -->
 => [argtest 1/2] FROM docker.io/library/ubuntu:latest@sha256:8a37d68f4f73ebf3d4efafbcf66379bf3728902a8038616808f04  0.0s
 => => resolve docker.io/library/ubuntu:latest@sha256:8a37d68f4f73ebf3d4efafbcf66379bf3728902a8038616808f04e34a9ab6  0.0s
 => CACHED [argtest 2/2] RUN echo foo                                                                                0.0s
 => [argtest] exporting to image                                                                                     0.0s
 => => exporting layers                                                                                              0.0s
<-- SNIP -->
Attaching to argtest-1
argtest-1  | PATH=/usr/local/sbin:/usr/local/bin:/usr/sbin:/usr/bin:/sbin:/bin
argtest-1  | HOSTNAME=d9a3789ac47a
argtest-1  | HOME=/root
argtest-1 exited with code 0
Overriding ENV
You can also override ENV at build time; this is slightly different from how ARG is overridden. For example, you cannot supply a key without a value with the ENV instruction, as shown in the following example Dockerfile:
FROM ubuntu:latest
ENV THEENV
RUN echo $THEENV
CMD ["env"]
When we try to build the image, we receive an error:
$ docker build -t envtest .
[+] Building 0.0s (1/1) FINISHED                                                                     docker:desktop-linux
 => [internal] load build definition from Dockerfile                                                                 0.0s
 => => transferring dockerfile: 98B                                                                                  0.0s
Dockerfile:3
--------------------
   1 |     FROM ubuntu:latest
   2 |
   3 | >>> ENV THEENV
   4 |     RUN echo $THEENV
   5 |
--------------------
ERROR: failed to solve: ENV must have two arguments
However, we can remove the ENV instruction from the Dockerfile:
FROM ubuntu:latest
RUN echo $THEENV
CMD ["env"]
This allows us to build the image:
$ docker build -t envtest .
<-- SNIP -->
 => [1/2] FROM docker.io/library/ubuntu:latest@sha256:8a37d68f4f73ebf3d4efafbcf66379bf3728902a8038616808f04e34a9ab6  0.0s
 => => resolve docker.io/library/ubuntu:latest@sha256:8a37d68f4f73ebf3d4efafbcf66379bf3728902a8038616808f04e34a9ab6  0.0s
 => CACHED [2/2] RUN echo $THEENV                                                                                    0.0s
 => exporting to image                                                                                               0.0s
 => => exporting layers                                                                                              0.0s
<-- SNIP -->
Then we can pass an environment variable via the docker run command using the -e flag:
$ docker run --rm -e THEENV=bar envtest
PATH=/usr/local/sbin:/usr/local/bin:/usr/sbin:/usr/bin:/sbin:/bin
HOSTNAME=638cf682d61f
THEENV=bar
HOME=/root
Although the .env file is usually associated with Docker Compose, it can also be used with docker run.
$ cat .env
THEENV=bar

$ docker run --rm --env-file ./.env envtest
PATH=/usr/local/sbin:/usr/local/bin:/usr/sbin:/usr/bin:/sbin:/bin
HOSTNAME=59efe1003811
THEENV=bar
HOME=/root
This can also be done using Docker Compose by using the environment key. Note that we use the variable format for the value:
services:
  envtest:
    build:
      context: .
    environment:
      THEENV: ${THEENV}
If we do not supply a value for THEENV, a warning is thrown:
$ docker compose up --build
WARN[0000] The "THEENV" variable is not set. Defaulting to a blank string.
<-- SNIP -->
 => [envtest 1/2] FROM docker.io/library/ubuntu:latest@sha256:8a37d68f4f73ebf3d4efafbcf66379bf3728902a8038616808f04  0.0s
 => => resolve docker.io/library/ubuntu:latest@sha256:8a37d68f4f73ebf3d4efafbcf66379bf3728902a8038616808f04e34a9ab6  0.0s
 => CACHED [envtest 2/2] RUN echo ${THEENV}                                                                          0.0s
 => [envtest] exporting to image                                                                                     0.0s
<-- SNIP -->
 ✔ Container dd-envtest-1    Recreated                                                                               0.1s
Attaching to envtest-1
envtest-1  | PATH=/usr/local/sbin:/usr/local/bin:/usr/sbin:/usr/bin:/sbin:/bin
envtest-1  | HOSTNAME=816d164dc067
envtest-1  | THEENV=
envtest-1  | HOME=/root
envtest-1 exited with code 0
The value for our variable can be supplied in several different ways, as follows:
- On the compose command line:
$ THEENV=bar docker compose up

[+] Running 2/0
 ✔ Synchronized File Shares                                                                                          0.0s
 ✔ Container dd-envtest-1    Recreated                                                                               0.1s
Attaching to envtest-1
envtest-1  | PATH=/usr/local/sbin:/usr/local/bin:/usr/sbin:/usr/bin:/sbin:/bin
envtest-1  | HOSTNAME=20f67bb40c6a
envtest-1  | THEENV=bar
envtest-1  | HOME=/root
envtest-1 exited with code 0
- In the shell environment on the host system:
$ export THEENV=bar
$ docker compose up

[+] Running 2/0
 ✔ Synchronized File Shares                                                                                          0.0s
 ✔ Container dd-envtest-1    Created                                                                                 0.0s
Attaching to envtest-1
envtest-1  | PATH=/usr/local/sbin:/usr/local/bin:/usr/sbin:/usr/bin:/sbin:/bin
envtest-1  | HOSTNAME=20f67bb40c6a
envtest-1  | THEENV=bar
envtest-1  | HOME=/root
envtest-1 exited with code 0
- In the special
.envfile:
$ cat .env
THEENV=bar

$ docker compose up

[+] Running 2/0
 ✔ Synchronized File Shares                                                                                          0.0s
 ✔ Container dd-envtest-1    Created                                                                                 0.0s
Attaching to envtest-1
envtest-1  | PATH=/usr/local/sbin:/usr/local/bin:/usr/sbin:/usr/bin:/sbin:/bin
envtest-1  | HOSTNAME=20f67bb40c6a
envtest-1  | THEENV=bar
envtest-1  | HOME=/root
envtest-1 exited with code 0
Finally, when running services directly using docker compose run, you can use the -e flag to override the .env file.
$ docker compose run -e THEENV=bar envtest

[+] Creating 1/0
 ✔ Synchronized File Shares                                                                                          0.0s
PATH=/usr/local/sbin:/usr/local/bin:/usr/sbin:/usr/bin:/sbin:/bin
HOSTNAME=219e96494ddd
TERM=xterm
THEENV=bar
HOME=/root
The tl;dr
If you need to access a variable during the build process but not at runtime, use ARG. If you need to access the variable both during the build and at runtime, or only at runtime, use ENV.
To decide between them, consider the following flow (Figure 1):

Both ARG and ENV can be overridden from the command line in docker run and docker compose, giving you a powerful way to dynamically update variables and build flexible workflows.
Learn more
- Discover more Docker Best Practices.
- Subscribe to the Docker Newsletter.
- Get the latest release of Docker Desktop.
- Have questions? The Docker community is here to help.
- New to Docker? Get started.
Docker for Web Developers: Getting Started with the Basics
Docker is known worldwide as a popular application containerization platform. But it also has a lesser-known and intriguing alter ego. It’s a popular go-to platform among web developers for its speed, flexibility, broad user base, and collaborative capabilities.
Docker has been growing as a modern solution that brings innovation to web development using containerization. With containers, developers and web development projects can become more efficient, save time, and drive fresh creativity. Web developers use Docker for development because it ensures consistency across different environments, eliminating the “it works on my machine” problem. Docker also simplifies dependency management, enhances resource efficiency, supports scalable microservices architectures, and allows for rapid deployment and rollback, making it an indispensable tool for modern web development projects.
In this post, we dive into the benefits of using Docker in businesses from small to large, and review Docker’s broad capabilities, strengths, and features for bolstering web development and developer productivity.
What is Docker?
Docker is secure, out-of-the-box containerization software offering developers and teams a robust, hybrid toolkit to develop, test, monitor, ship, deploy, and run enterprise and web applications. Containerization lets developers separate their applications from infrastructure so they can run them without worrying about what is installed on the host, giving development teams flexibility and collaborative advantages over virtual machines, while delivering better source code faster.
The Docker suite enables developers to package and run their application code in lightweight, local, standardized containers that have everything needed to run the application — including an operating system and required services. Docker allows developers to run many containers simultaneously on a host, while also allowing the containers to be shared with others. By working within this collaborative workspace, productive and direct communications can thrive and development processes become easier, more accurate, and more secure. Many of the components in Docker are open source, including Docker Compose, BuildKit, the Docker command-line interface (Docker CLI), containerd, and more.
As the #1 containerization software for developers and teams, Docker is well-suited for all flavors of development. Highlights include:
- Docker Hub: The world’s largest repository of container images, which helps developers and open source contributors find, use, and share their Docker-inspired container images.
- Docker Compose: A tool for defining and running multi-container applications.
- Docker Engine: An open source containerization technology for building and containerizing applications.
- Docker Desktop: Includes the Docker Engine and other open source components; proprietary components; and features such as an intuitive GUI, synchronized file shares, access to cloud resources, debugging features, native host integration, governance, and security features that support Enhanced Container Isolation (ECI), air-gapped containers, and administrative settings management.
- Docker Build Cloud: A Docker service that lets developers build their container images on a cloud infrastructure that ensures fast builds anywhere for all team members.
What is a container?
Containers are lightweight, standalone, executable packages of software that include everything needed to run an application: code, runtime, libraries, environment variables, and configuration files. Containers are isolated from each other and can be connected to networks or storage and can be used to create new images based on their current states.
Docker containers are faster and more efficient for software creation than virtualization, which uses a resource-heavy software abstraction layer on top of computer hardware. Additionally, Docker containers require fewer physical hardware resources than virtual machines and communicate with their host systems through well-defined channels.
Why use Docker for web applications?
Docker is a popular choice for developers building enterprise applications for various reasons, including consistent environments, efficient resource usage, speed, container isolation, scalability, flexibility, and portability. And, Docker is popular for web development for these same reasons.
Consistent environments
Using Docker containers, web developers can build web applications that provide consistent environments from their development all the way through to production. By including all the components needed to run an application within an isolated container, Docker addresses those issues by allowing developers to produce and package their containers and then run them through various development, testing, and production environments to ensure their quality, security, and performance. This approach helps developers prevent the common and frustrating “but it works on my machine” conundrum, assuring that the code will run and perform well anywhere, from development through deployment.
Efficiency in using resources
With its lightweight architecture, Docker uses system resources more efficiently than virtual machines, allowing developers to run more applications on the same hardware. Docker containers allow multiple containers to run on a single host and gain resource efficiency due to the isolation and allocation features that containers incorporate. Additionally, containers require less memory and disk space to perform their tasks, saving on hardware costs and making resource management easier. Docker also saves development time by allowing container images to be reused as needed.
Speed
Docker’s design and components also give developers significant speed advantages in setting up and tearing down container environments, allowing needed processes to be completed in seconds due to its lightweight and flexible application architecture. This allows developers to rapidly iterate their containerized applications, increasing their productivity for writing, building, testing, monitoring, and deploying their creations.
Isolation
Docker’s application isolation capabilities provide huge benefits for developers, allowing them to write code and build their containers and applications simultaneously, with changes made in one not affecting the others. For developers, these capabilities allow them to find and isolate any bad code before using it elsewhere, improving security and manageability.
Scalability, flexibility, and portability
Docker’s flexible platform design also gives developers broad capabilities to easily scale applications up or down based on demand, while also allowing them to be deployed across different servers. These features give developers the ability to manage different workloads and system resources as needed. And, its portability features mean that developers can create their applications once and then use them in any environment, further ensuring their reliability and proper operation through the development cycle to production.
How web developers use Docker
There is a wide range of Docker use cases for today’s web developers, including its flexibility as a local development environment that can be quickly set up to match desired production environments; as an important partner for microservices architectures, where each service can be developed, tested, and deployed independently; or as an integral component in continuous integration and continuous deployment (CI/CD) pipelines for automated testing and deployment.
Other important Docker use cases include the availability of a strong and knowledgeable user community to help drive developer experiences and skills around containerization; its importance and suitability for vital cross-platform production and testing; and deep resources and availability for container images that are usable for a wide range of application needs.
Get started with Docker for web development (in 6 steps)
So, you want to get a Docker container up and running quickly? Let’s dive in using the Docker Desktop GUI. In this example, we will use the Docker version for Microsoft Windows, but there are also Docker versions for use on Mac and many flavors of Linux.
Step 1: Install Docker Desktop
Start by downloading the installer from the docs or from the release notes.
Double-click Docker Desktop for Windows Installer.exe to run the installer. By default, Docker Desktop is installed at C:\Program Files\Docker\Docker.
When prompted, be sure to choose the WSL 2 option instead of the Hyper-V option on the configuration page, depending on your choice of backend. If your system only supports one of the two options, you will not be able to select which backend to use.
Follow the instructions on the installation wizard to authorize the installer and proceed with the installation. When the installation is successful, select Close to complete the installation process.
Step 2: Create a Dockerfile
A Dockerfile is a text-based file that contains a running script of instructions giving full details on how a developer wants to build their Docker container image. A Dockerfile, which uses no file extension, is built by creating a file named Dockerfile in the getting-started-app directory, which is also where the package.json file is found.
A Dockerfile contains details about the container’s operating system, file locations, environment, dependencies, configuration, and more. Check out the useful Docker best practices documentation for creating quality Dockerfiles.
Here is a basic Dockerfile example for setting up an Apache web server.
Create a Dockerfile in your project:
FROM httpd:2.4
COPY ./public-html/ /usr/local/apache2/htdocs/
Next, run the commands to build and run the Docker image:
$ docker build -t my-apache2
$ docker run -dit --name my-running-app -p 8080:80 my-apache2
Visit http://localhost:8080 to see it working.
Step 3: Build your Docker image
The Dockerfile that was just created allows us to start building our first Docker container image. The docker build command initiated in the previous step started the new Docker image using the Dockerfile and related “context,” which is the set of files located in the specified PATH or URL. The build process can refer to any of the files in the context. Docker images begin with a base image that must be downloaded from a repository to start a new image project.
Step 4: Run your Docker container
To run a new container, start with the docker run command, which runs a command in a new container. The command pulls an image if needed and then starts the container. By default, when you create or run a container using docker create or docker run, the container does not expose any of its ports to the outside world. To make a port available to services outside of Docker you must use the --publish or -p flag commands. This creates a firewall rule in the host, mapping a container port to a port on the Docker host to the outside world.
Step 5: Access your web application
How to access a web application that is running inside a Docker container.
To access a web application running inside a Docker container, you need to publish the container’s port to the host. This can be done using the docker run command with the --publish or -p flag. The format of the --publish command is [host_port]:[container_port].
Here is an example of how to run a container and publish its port using the Docker CLI:
$ docker run -d -p 8080:80 docker/welcome-to-docker
In this command, the first 8080 refers to the host port. This is the port on your local machine that will be used to access the application running inside the container. The second 80 refers to the container port. This is the port that the application inside the container listens on for incoming connections. Hence, the command binds to port 8080 of the host to port 80 on the container system.
After running the container with the published port, you can access the web application by opening a web browser and visiting http://localhost:8080.
You can also use Docker Compose to run the container and publish its port. Here is an example of a compose.yaml file that does this:
services:
 app:
   image: docker/welcome-to-docker
   ports:
     - 8080:80
After creating this file, you can start the application with the docker compose up command. Then, you can access the web application at http://localhost:8080.
Step 6: Make changes and update
Updating a Docker application in a container requires several steps. With the command-line interface use the docker stop command to stop the container, then the existing container can be removed by using the docker rm (remove) command. Next, a new updated container can be started by using a new docker run command with the updated container. The old container must be stopped before replacing it because the old container is already using the host’s port 3000. Only one process on the machine — including containers — can listen to a specific port at a time. Only after the old container is stopped can it be removed and replaced with a new one.
Conclusion
In this blog post, we learned about how Docker brings valuable benefits to web developers to speed up and improve their operations and creativity, and we touched on how web developers can get started with the platform on Day One, including basic instructions on setting up Docker quickly to start using it for web development.
Docker delivers streamlined workflows for web development due to its lightweight architecture and broad collaboration, application design, scalability, and other benefits. Docker expands the capabilities of web application developers, giving them flexible tools for everything from building better code to testing, monitoring, and deploying reliable code more quickly.
Subscribe to our newsletter to stay up-to-date about Docker and its latest uses and innovations.
Learn more
- Subscribe to the Docker Newsletter.
- Get the latest release of Docker Desktop.
- Continue learning with Docker training.
- Visit Docker Resources to explore more materials.
- Check out our documentation guides.
- Have questions? The Docker community is here to help.
Is Kubernetes Similar to AWS? A Comparative Analysis
Running Airflow in a Docker container
Local LLM Messenger: Chat with GenAI on Your iPhone
In this AI/ML Hackathon post, we want to share another winning project from last year’s Docker AI/ML Hackathon. This time we will dive into Local LLM Messenger, an honorable mention winner created by Justin Garrison.
Developers are pushing the boundaries to bring the power of artificial intelligence (AI) to everyone. One exciting approach involves integrating Large Language Models (LLMs) with familiar messaging platforms like Slack and iMessage. This isn’t just about convenience; it’s about transforming these platforms into launchpads for interacting with powerful AI tools.

Imagine this: You need a quick code snippet or some help brainstorming solutions to coding problems. With LLMs integrated into your messaging app, you can chat with your AI assistant directly within the familiar interface to generate creative ideas or get help brainstorming solutions. No more complex commands or clunky interfaces — just a natural conversation to unlock the power of AI.
Integrating with messaging platforms can be a time-consuming task, especially for macOS users. That’s where Local LLM Messenger (LoLLMM) steps in, offering a streamlined solution for connecting with your AI via iMessage.
What makes LoLLM Messenger unique?
The following demo, which was submitted to the AI/ML Hackathon, provides an overview of LoLLM Messenger (Figure 1).
The LoLLM Messenger bot allows you to send iMessages to Generative AI (GenAI) models running directly on your computer. This approach eliminates the need for complex setups and cloud services, making it easier for developers to experiment with LLMs locally.
Key features of LoLLM Messenger
LoLLM Messenger includes impressive features that make it a standout among similar projects, such as:
- Local execution: Runs on your computer, eliminating the need for cloud-based services and ensuring data privacy.
- Scalability: Handles multiple AI models simultaneously, allowing users to experiment with different models and switch between them easily.
- User-friendly interface: Offers a simple and intuitive interface, making it accessible to users of all skill levels.
- Integration with Sendblue: Integrates seamlessly with Sendblue, enabling users to send iMessages to the bot and receive responses directly in their inbox.
- Support for ChatGPT: Supports the GPT-3.5 Turbo and DALL-E 2 models, providing users with access to powerful AI capabilities.
- Customization: Allows users to customize the bot’s behavior by modifying the available commands and integrating their own AI models.
How does it work?
The architecture diagram shown in Figure 2 provides a high-level overview of the components and interactions within the LoLLM Messenger project. It illustrates how the main application, AI models, messaging platform, and external APIs work together to enable users to send iMessages to AI models running on their computers.

By leveraging Docker, Sendblue, and Ollama, LoLLM Messenger offers a seamless and efficient solution for those seeking to explore AI models without the need for cloud-based services. LoLLM Messenger utilizes Docker Compose to manage the required services.
Docker Compose simplifies the process by handling the setup and configuration of multiple containers, including the main application, ngrok (for creating a secure tunnel), and Ollama (a server that bridges the gap between messaging apps and AI models).
Technical stack
The LoLLM Messenger tech stack includes:
- Lollmm service: This service is responsible for running the main application. It handles incoming iMessages, processing user requests, and interacting with the AI models. The lollmm service communicates with the Ollama model, which is a powerful AI model for text and image generation.
- Ngrok: This service is used to expose the main application’s port 8000 to the internet using
ngrok. It runs in the Alpine image and forwards traffic from port 8000 to the ngrok tunnel. The service is set to run in the host network mode. - Ollama: This service runs the Ollama model, which is a powerful AI model for text and image generation. It listens on port 11434 and mounts a volume from
./run/ollamato/home/ollama. The service is set to deploy with GPU resources, ensuring that it can utilize an NVIDIA GPU if available. - Sendblue: The project integrates with Sendblue to handle iMessages. You can set up Sendblue by adding your API Key and API Secret in the
app/.envfile and adding your phone number as a Sendblue contact.
Getting started
To get started, ensure that you have installed and set up the following components:
- Install the latest Docker Desktop.
- Register for Sendblue https://app.sendblue.co/auth/login.
- Create an ngrok account using your preferred way and get authtoken https://dashboard.ngrok.com/signup.
Clone the repository
Open a terminal window and run the following command to clone this sample application:
git clone https://github.com/dockersamples/local-llm-messenger
You should now have the following files in your local-llm-messenger directory:
.
├── LICENSE
├── README.md
├── app
│   ├── Dockerfile
│   ├── Pipfile
│   ├── Pipfile.lock
│   ├── default.ai
│   ├── log_conf.yaml
│   └── main.py
├── docker-compose.yaml
├── img
│   ├── banner.png
│   ├── lasers.gif
│   └── lollm-demo-1.gif
├── justfile
└── test
    ├── msg.json
    └── ollama.json

4 directories, 15 files
The script main.py file under the /app directory is a Python script that uses the FastAPI framework to create a web server for an AI-powered messaging application. The script interacts with OpenAI’s GPT-3 model and an Ollama endpoint for generating responses. It uses Sendblue’s API for sending messages.
The script first imports necessary libraries, including FastAPI, requests, logging, and other required modules.
from dotenv import load_dotenv
import os, requests, time, openai, json, logging
from pprint import pprint
from typing import Union, List

from fastapi import FastAPI
from pydantic import BaseModel

from sendblue import Sendblue
This section sets up configuration variables, such as API keys, callback URL, Ollama API endpoint, and maximum context and word limits.
SENDBLUE_API_KEY = os.environ.get("SENDBLUE_API_KEY")
SENDBLUE_API_SECRET = os.environ.get("SENDBLUE_API_SECRET")
openai.api_key = os.environ.get("OPENAI_API_KEY")
OLLAMA_API = os.environ.get("OLLAMA_API_ENDPOINT", "http://ollama:11434/api")
# could also use request.headers.get('referer') to do dynamically
CALLBACK_URL = os.environ.get("CALLBACK_URL")
MAX_WORDS = os.environ.get("MAX_WORDS")
Next, the script performs the logging configuration, setting the log level to INFO. Creates a file handler for logging messages to a file named app.log.
It then defines various functions for interacting with the AI models, managing context, sending messages, handling callbacks, and executing slash commands.
def set_default_model(model: str):
    try:
        with open("default.ai", "w") as f:
            f.write(model)
            f.close()
            return
    except IOError:
        logger.error("Could not open file")
        exit(1)


def get_default_model() -> str:
    try:
        with open("default.ai") as f:
            default = f.readline().strip("\n")
            f.close()
            if default != "":
                return default
            else:
                set_default_model("llama2:latest")
                return ""
    except IOError:
        logger.error("Could not open file")
        exit(1)


def validate_model(model: str) -> bool:
    available_models = get_model_list()
    if model in available_models:
        return True
    else:
        return False


def get_ollama_model_list() -> List[str]:
    available_models = []

    tags = requests.get(OLLAMA_API + "/tags")
    all_models = json.loads(tags.text)
    for model in all_models["models"]:
        available_models.append(model["name"])
    return available_models


def get_openai_model_list() -> List[str]:
    return ["gpt-3.5-turbo", "dall-e-2"]


def get_model_list() -> List[str]:
    ollama_models = []
    openai_models = []
    all_models = []
    if "OPENAI_API_KEY" in os.environ:
        # print(openai.Model.list())
        openai_models = get_openai_model_list()

    ollama_models = get_ollama_model_list()
    all_models = ollama_models + openai_models
    return all_models


DEFAULT_MODEL = get_default_model()

if DEFAULT_MODEL == "":
    # This is probably the first run so we need to install a model
    if "OPENAI_API_KEY" in os.environ:
        print("No default model set. openai is enabled. using gpt-3.5-turbo")
        DEFAULT_MODEL = "gpt-3.5-turbo"
    else:
        print("No model found and openai not enabled. Installing llama2:latest")
        pull_data = '{"name": "llama2:latest","stream": false}'
        try:
            pull_resp = requests.post(OLLAMA_API + "/pull", data=pull_data)
            pull_resp.raise_for_status()
        except requests.exceptions.HTTPError as err:
            raise SystemExit(err)
        set_default_model("llama2:latest")
        DEFAULT_MODEL = "llama2:latest"


if validate_model(DEFAULT_MODEL):
    logger.info("Using model: " + DEFAULT_MODEL)
else:
    logger.error("Model " + DEFAULT_MODEL + " not available.")
    logger.info(get_model_list())

    pull_data = '{"name": "' + DEFAULT_MODEL + '","stream": false}'
    try:
        pull_resp = requests.post(OLLAMA_API + "/pull", data=pull_data)
        pull_resp.raise_for_status()
    except requests.exceptions.HTTPError as err:
        raise SystemExit(err)


def set_msg_send_style(received_msg: str):
    """Will return a style for the message to send based on matched words in received message"""
    celebration_match = ["happy"]
    shooting_star_match = ["star", "stars"]
    fireworks_match = ["celebrate", "firework"]
    lasers_match = ["cool", "lasers", "laser"]
    love_match = ["love"]
    confetti_match = ["yay"]
    balloons_match = ["party"]
    echo_match = ["what did you say"]
    invisible_match = ["quietly"]
    gentle_match = []
    loud_match = ["hear"]
    slam_match = []

    received_msg_lower = received_msg.lower()
    if any(x in received_msg_lower for x in celebration_match):
        return "celebration"
    elif any(x in received_msg_lower for x in shooting_star_match):
        return "shooting_star"
    elif any(x in received_msg_lower for x in fireworks_match):
        return "fireworks"
    elif any(x in received_msg_lower for x in lasers_match):
        return "lasers"
    elif any(x in received_msg_lower for x in love_match):
        return "love"
    elif any(x in received_msg_lower for x in confetti_match):
        return "confetti"
    elif any(x in received_msg_lower for x in balloons_match):
        return "balloons"
    elif any(x in received_msg_lower for x in echo_match):
        return "echo"
    elif any(x in received_msg_lower for x in invisible_match):
        return "invisible"
    elif any(x in received_msg_lower for x in gentle_match):
        return "gentle"
    elif any(x in received_msg_lower for x in loud_match):
        return "loud"
    elif any(x in received_msg_lower for x in slam_match):
        return "slam"
    else:
        return
Two classes, Msg and Callback, are defined to represent the structure of incoming messages and callback data. The code also includes various functions and classes to handle different aspects of the messaging platform, such as setting default models, validating models, interacting with the Sendblue API, and processing messages. It also includes functions to handle slash commands, create messages from context, and append context to a file.
class Msg(BaseModel):
    accountEmail: str
    content: str
    media_url: str
    is_outbound: bool
    status: str
    error_code: int | None = None
    error_message: str | None = None
    message_handle: str
    date_sent: str
    date_updated: str
    from_number: str
    number: str
    to_number: str
    was_downgraded: bool | None = None
    plan: str


class Callback(BaseModel):
    accountEmail: str
    content: str
    is_outbound: bool
    status: str
    error_code: int | None = None
    error_message: str | None = None
    message_handle: str
    date_sent: str
    date_updated: str
    from_number: str
    number: str
    to_number: str
    was_downgraded: bool | None = None
    plan: str


def msg_openai(msg: Msg, model="gpt-3.5-turbo"):
    """Sends a message to openai"""
    message_with_context = create_messages_from_context("openai")

    # Add the user's message and system context to the messages list
    messages = [
        {"role": "user", "content": msg.content},
        {"role": "system", "content": "You are an AI assistant. You will answer in haiku."},
    ]

    # Convert JSON strings to Python dictionaries and add them to messages
    messages.extend(
        [
            json.loads(line)  # Convert each JSON string back into a dictionary
            for line in message_with_context
        ]
    )

    # Send the messages to the OpenAI model
    gpt_resp = client.chat.completions.create(
        model=model,
        messages=messages,
    )

    # Append the system context to the context file
    append_context("system", gpt_resp.choices[0].message.content)

    # Send a message to the sender
    msg_response = sendblue.send_message(
        msg.from_number,
        {
            "content": gpt_resp.choices[0].message.content,
            "status_callback": CALLBACK_URL,
        },
    )

    return


def msg_ollama(msg: Msg, model=None):
    """Sends a message to the ollama endpoint"""
    if model is None:
        logger.error("Model is None when calling msg_ollama")
        return  # Optionally handle the case more gracefully

    ollama_headers = {"Content-Type": "application/json"}
    ollama_data = (
        '{"model":"' + model +
        '", "stream": false, "prompt":"' +
        msg.content +
        " in under " +
        str(MAX_WORDS) +  # Make sure MAX_WORDS is a string
        ' words"}'
    )
    ollama_resp = requests.post(
        OLLAMA_API + "/generate", headers=ollama_headers, data=ollama_data
    )
    response_dict = json.loads(ollama_resp.text)
    if ollama_resp.ok:
        send_style = set_msg_send_style(msg.content)
        append_context("system", response_dict["response"])
        msg_response = sendblue.send_message(
            msg.from_number,
            {
                "content": response_dict["response"],
                "status_callback": CALLBACK_URL,
                "send_style": send_style,
            },
        )
    else:
        msg_response = sendblue.send_message(
            msg.from_number,
            {
                "content": "I'm sorry, I had a problem processing that question. Please try again.",
                "status_callback": CALLBACK_URL,
            },
        )
    return
Navigate to the app/ directory and create a new file for adding environment variables.
touch .env
SENDBLUE_API_KEY=your_sendblue_api_key
SENDBLUE_API_SECRET=your_sendblue_api_secret
OLLAMA_API_ENDPOINT=http://host.docker.internal:11434/api
OPENAI_API_KEY=your_openai_api_key
Next, add the ngrok authtoken to the Docker Compose file. You can get the authtoken from this link.
services:
  lollm:
    build: ./app
    # command:
      # - sleep
      # - 1d
    ports:
      - 8000:8000
    env_file: ./app/.env
    volumes:
      - ./run/lollm:/run/lollm
    depends_on:
      - ollama
    restart: unless-stopped
    network_mode: "host"
  ngrok:
    image: ngrok/ngrok:alpine
    command:
      - "http"
      - "8000"
      - "--log"
      - "stdout"
    environment:
      - NGROK_AUTHTOKEN=2i6iXXXXXXXXhpqk1aY1
    network_mode: "host"
  ollama:
    image: ollama/ollama
    ports:
      - 11434:11434
    volumes:
      - ./run/ollama:/home/ollama
    network_mode: "host"
Running the application stack
Next, you can run the application stack, as follows:
$ docker compose up
You will see output similar to the following:
[+] Running 4/4
 ✔ Container local-llm-messenger-ollama-1                           Create...                                          0.0s
 ✔ Container local-llm-messenger-ngrok-1                            Created                                            0.0s
 ✔ Container local-llm-messenger-lollm-1                            Recreat...                                         0.1s
 ! lollm Published ports are discarded when using host network mode                                                    0.0s
Attaching to lollm-1, ngrok-1, ollama-1
ollama-1  | 2024/06/20 03:14:46 routes.go:1011: INFO server config env="map[OLLAMA_DEBUG:false OLLAMA_FLASH_ATTENTION:false OLLAMA_HOST:http://0.0.0.0:11434 OLLAMA_KEEP_ALIVE: OLLAMA_LLM_LIBRARY: OLLAMA_MAX_LOADED_MODELS:1 OLLAMA_MAX_QUEUE:512 OLLAMA_MAX_VRAM:0 OLLAMA_MODELS:/root/.ollama/models OLLAMA_NOHISTORY:false OLLAMA_NOPRUNE:false OLLAMA_NUM_PARALLEL:1 OLLAMA_ORIGINS:[http://localhost https://localhost http://localhost:* https://localhost:* http://127.0.0.1 https://127.0.0.1 http://127.0.0.1:* https://127.0.0.1:* http://0.0.0.0 https://0.0.0.0 http://0.0.0.0:* https://0.0.0.0:* app://* file://* tauri://*] OLLAMA_RUNNERS_DIR: OLLAMA_TMPDIR:]"
ollama-1  | time=2024-06-20T03:14:46.308Z level=INFO source=images.go:725 msg="total blobs: 0"
ollama-1  | time=2024-06-20T03:14:46.309Z level=INFO source=images.go:732 msg="total unused blobs removed: 0"
ollama-1  | time=2024-06-20T03:14:46.309Z level=INFO source=routes.go:1057 msg="Listening on [::]:11434 (version 0.1.44)"
ollama-1  | time=2024-06-20T03:14:46.309Z level=INFO source=payload.go:30 msg="extracting embedded files" dir=/tmp/ollama2210839504/runners
ngrok-1   | t=2024-06-20T03:14:46+0000 lvl=info msg="open config file" path=/var/lib/ngrok/ngrok.yml err=nil
ngrok-1   | t=2024-06-20T03:14:46+0000 lvl=info msg="open config file" path=/var/lib/ngrok/auth-config.yml err=nil
ngrok-1   | t=2024-06-20T03:14:46+0000 lvl=info msg="starting web service" obj=web addr=0.0.0.0:4040 allow_hosts=[]
ngrok-1   | t=2024-06-20T03:14:46+0000 lvl=info msg="client session established" obj=tunnels.session
ngrok-1   | t=2024-06-20T03:14:46+0000 lvl=info msg="tunnel session started" obj=tunnels.session
ngrok-1   | t=2024-06-20T03:14:46+0000 lvl=info msg="started tunnel" obj=tunnels name=command_line addr=http://localhost:8000 url=https://94e1-223-185-128-160.ngrok-free.app
ollama-1  | time=2024-06-20T03:14:48.602Z level=INFO source=payload.go:44 msg="Dynamic LLM libraries [cpu cuda_v11]"
ollama-1  | time=2024-06-20T03:14:48.603Z level=INFO source=types.go:71 msg="inference compute" id=0 library=cpu compute="" driver=0.0 name="" total="7.7 GiB" available="3.9 GiB"
lollm-1   | INFO:     Started server process [1]
lollm-1   | INFO:     Waiting for application startup.
lollm-1   | INFO:     Application startup complete.
lollm-1   | INFO:     Uvicorn running on http://0.0.0.0:8000 (Press CTRL+C to quit)
ngrok-1   | t=2024-06-20T03:16:58+0000 lvl=info msg="join connections" obj=join id=ce119162e042 l=127.0.0.1:8000 r=[2401:4900:8838:8063:f0b0:1866:e957:b3ba]:54384
lollm-1   | OLLAMA API IS http://host.docker.internal:11434/api
lollm-1   | INFO:     2401:4900:8838:8063:f0b0:1866:e957:b3ba:0 - "GET / HTTP/1.1" 200 OK
If you’re testing it on a system without an NVIDIA GPU, then you can skip the deploy attribute of the Compose file.
Watch the output for your ngrok endpoint. In our case, it shows: https://94e1-223-185-128-160.ngrok-free.app/
Next, append /msg to the following ngrok webhooks URL: https://94e1-223-185-128-160.ngrok-free.app/
Then, add it under the webhooks URL section on Sendblue and save it (Figure 3). The ngrok service is configured to expose the lollmm service on port 8000 and provide a secure tunnel to the public internet using the ngrok.io domain.
The ngrok service logs indicate that it has started the web service and established a client session with the tunnels. They also show that the tunnel session has started and has been successfully established with the lollmm service.
The ngrok service is configured to use the specified ngrok authentication token, which is required to access the ngrok service. Overall, the ngrok service is running correctly and is able to establish a secure tunnel to the lollmm service.

Ensure that there are no error logs when you run the ngrok container (Figure 4).

Ensure that the LoLLM Messenger container is actively up and running (Figure 5).

The logs show that the Ollama service has opened the specified port (11434) and is listening for incoming connections. The logs also indicate that the Ollama service has mounted the /home/ollama directory from the host machine to the /home/ollama directory within the container.
Overall, the Ollama service is running correctly and is ready to provide AI models for inference.
Testing the functionality
To test the functionality of the lollm service, you first need to add your contact number to the Sendblue dashboard. Then you should be able to send messages to the Sendblue number and observe the responses from the lollmm service (Figure 6).

The Sendblue platform will send HTTP requests to the /msg endpoint of your lollmm service, and your lollmm service will process these requests and return the appropriate responses.
- The lollmm service is set up to listen on port 8000.
- The ngrok tunnel is started and provides a public URL, such as https://94e1-223-185-128-160.ngrok-free.app.
- The lollmm service receives HTTP requests from the ngrok tunnel, including GET requests to the root path (
/) and other paths, such as/favicon.ico,/predict,/mdg, and/msg. - The lollmm service responds to these requests with appropriate HTTP status codes, such as 200 OK for successful requests and 404 Not Found for requests to paths that do not exist.
- The ngrok tunnel logs the join connections, indicating that clients are connecting to the lollmm service through the ngrok tunnel.

The first time you chat with LLM by typing /list (Figure 7), you can check the logs as shown:
ngrok-1   | t=2024-07-09T02:34:30+0000 lvl=info msg="join connections" obj=join id=12bd50a8030b l=127.0.0.1:8000 r=18.223.220.3:44370
lollm-1   | OLLAMA API IS http://host.docker.internal:11434/api
lollm-1   | INFO:     18.223.220.3:0 - "POST /msg HTTP/1.1" 200 OK
ngrok-1   | t=2024-07-09T02:34:53+0000 lvl=info msg="join connections" obj=join id=259fda936691 l=127.0.0.1:8000 r=18.223.220.3:36712
lollm-1   | INFO:     18.223.220.3:0 - "POST /msg HTTP/1.1" 200 OK
Next, let’s install the codellama model by typing /install codellama:latest (Figure 8).

You can see the following container logs once you set the default model to codellama:latest as shown:
ngrok-1   | t=2024-07-09T03:39:23+0000 lvl=info msg="join connections" obj=join id=026d8fad5c87 l=127.0.0.1:8000 r=18.223.220.3:36282
lollm-1   | setting default model
lollm-1   | INFO:     18.223.220.3:0 - "POST /msg HTTP/1.1" 200 OK
The lollmm service is running correctly and can handle HTTP requests from the ngrok tunnel. You can use the ngrok tunnel URL to test the functionality of the lollmm service by sending HTTP requests to the appropriate paths (Figure 9).

Conclusion
LoLLM Messenger is a valuable tool for developers and enthusiasts looking to push the boundaries of LLM integration within messaging apps. It allows developers to craft custom chatbots for specific needs, add real-time sentiment analysis to messages, or explore entirely new AI features in your messaging experience.
To get started, you can explore the LoLLM Messenger project on GitHub and discover the potential of local LLM.
Learn more
- Subscribe to the Docker Newsletter.
- Read the AI/ML Hackathon collection.
- Get the latest release of Docker Desktop.
- Vote on what’s next! Check out our public roadmap.
- Have questions? The Docker community is here to help.
- New to Docker? Get started.

Docker Desktop 4.32: Beta Releases of Compose File Viewer, Terminal Shell Integration, and Volume Backups to Cloud Providers
In this post:
- Compose File Viewer (Beta)
- Terminal integration (Beta)
- Enterprise-grade Volume Backup to cloud providers (Beta)
- Docker Desktop MSI Installer and new login enforcement alternatives (Early Access)
Docker Desktop 4.32 includes a series of powerful enhancements designed to streamline data workflows and elevate user productivity. The latest Docker Desktop release enhances the experience across development teams of all sizes and emphasizes our commitment to providing a secure hybrid development platform that enables efficient building, sharing, and running of innovative applications anywhere.
Key features of the Docker Desktop 4.32 release include:
- Improving developer’s experience with Compose File Viewer (Beta)
- Enhancing developer productivity with Terminal in Docker Desktop (Beta)
- Simplifying data management with Volume Backups to Cloud Providers (Beta)
- Streamlining administration with Docker Desktop’s MSI Installer (Early Access)

Compose File Viewer (Beta) now available
Launched as Beta rolled out to limited customers during our Docker Desktop 4.31 release, Compose File Viewer has now been rolled out to all customers. Users can now see enhanced instructions for setting up Compose Watch when launching the viewer from the Compose CLI.
Configuring multi-container applications can be complex, so Compose File Viewer helps developers see their Docker Compose configuration file in Docker Desktop with information about each section a click away. This makes it simpler for developers to orient on basic Compose concepts and learn to set up Compose Watch, making it easier to sync code changes into running containers.
Check out this new File Viewer through the View Configuration option in the Compose command line or by viewing a Compose stack in the Containers tab, then clicking the View Configuration button.
These enhancements are another step forward as we continue improving Compose to help you get the benefits of containerized development faster.
Terminal experience in Docker Desktop (Beta)
We are excited to introduce the new terminal feature in Docker Desktop. This enhancement integrates a terminal directly within the Docker Desktop GUI, enabling seamless transitions between CLI and GUI interactions within a single window. By incorporating a terminal shell into the Docker Desktop interface, we significantly reduce the friction associated with context switching for developers.
This functionality is designed to streamline workflows, accelerate delivery times, and enhance overall developer productivity.

Enterprise-grade Volume Backup to cloud providers (Beta)
We are pleased to announce the release of an advanced Beta feature for interacting with volumes data within Docker Desktop. Building on our previously introduced Volumes Backup & Share functionalities, we are now introducing the capability to back up volumes to multiple cloud providers.
With a Docker Business subscription, users can seamlessly back up their volumes to various cloud storage services, including AWS, Azure, and GCP.
This new Volume Backup to cloud providers feature represents the latest enhancement in our ongoing efforts to streamline data management capabilities within Docker Desktop.

Docker Desktop MSI Installer and new login enforcement alternatives (Early Access)
We have made it easier to enforce login for your organization and deploy using the MSI Installer, available for early access. These key enhancements aim to streamline administration, improve security, and enhance the user experience for Docker Business subscribers.
Docker is committed to helping enterprises of all sizes with enhanced Docker sign-in enforcement across Windows and macOS to help increase user logins, simplify administration, and reduce learning curves for IT administrators.
The Docker Desktop MSI Installer helps with mass deployments and customizations with standardized silent install parameters.

Although these updates are currently available only for early access, they reflect Docker’s commitment to simplifying deployment and streamlining administration for organizations of all sizes. With more of these administrative offerings becoming available soon, we encourage IT teams and administrators to start planning for these changes to enhance their Docker experience.
Conclusion
The Docker Desktop 4.32 release brings significant improvements aimed at streamlining workflows and boosting productivity for development teams of all sizes. With features like the Compose File Viewer, Terminal integration, and volume backups to cloud providers, Docker Desktop continues to simplify and enhance the developer experience. The new MSI Installer for easier administration also underlines our commitment to streamlining administration.
We look forward to seeing how these enhancements will help you build, share, and run innovative applications more effectively.
Learn more
- Authenticate and update to receive your subscription level’s newest Docker Desktop features.
- New to Docker? Create an account .
- Subscribe to the Docker Newsletter.
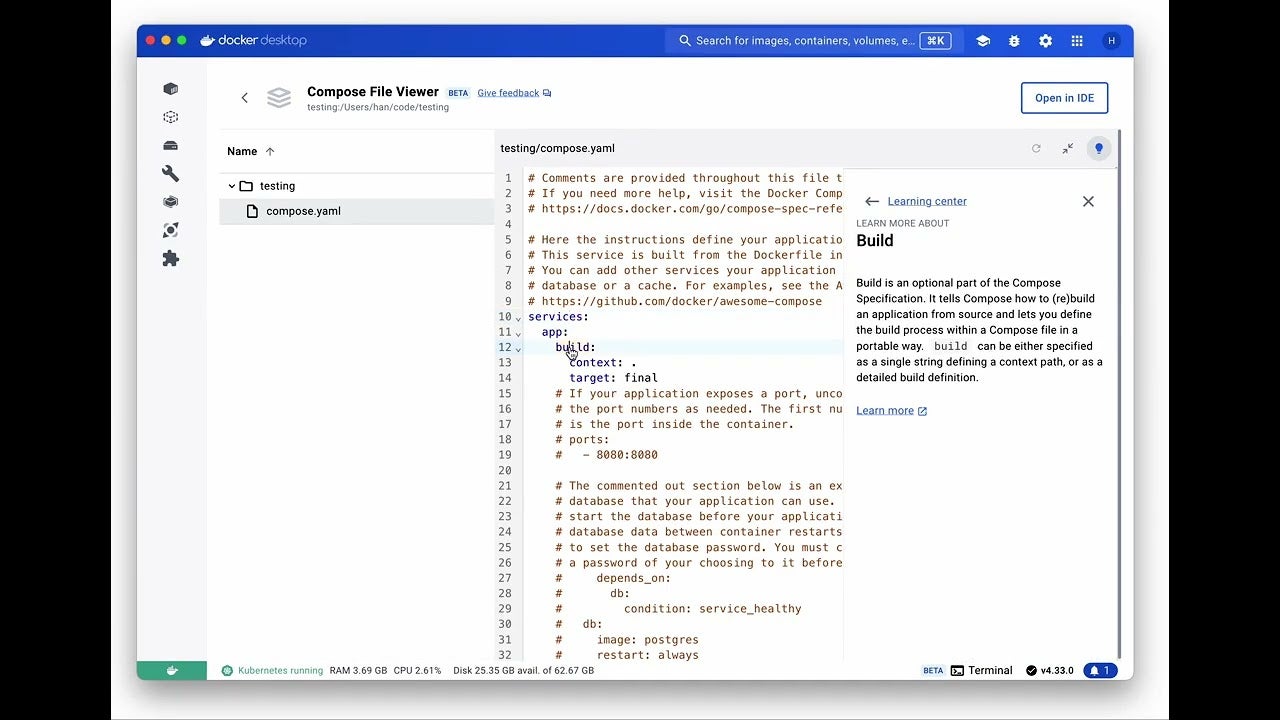
Docker Desktop 4.31: Air-Gapped Containers, Accelerated Builds, and Beta Releases of Docker Desktop on Windows on Arm, Compose File Viewer, and GitHub Actions
In this post:
- Air-gapped containers: Ensuring security and compliance
- Accelerating Builds in Docker Desktop with Docker Build Cloud
- Docker Desktop on Windows on Arm (Beta)
- Compose File Viewer (Beta)
- Deep Dive into GitHub Actions Docker Builds with Docker Desktop (Beta)
Docker Desktop’s latest release continues to empower development teams of every size, providing a secure hybrid development launchpad that supports productively building, sharing, and running innovative applications anywhere.
Highlights from the Docker Desktop 4.31 release include:
- Air-gapped containers help secure developer environments and apps to ensure peace of mind.
- Accelerating Builds in Docker Desktop with Docker Build Cloud helps developers build rapidly to increase productivity and ROI.
- Docker Desktop on Windows on Arm (WoA) Beta continues our commitment to supporting the Microsoft Developer ecosystem by leveraging the newest and most advanced development environments.
- Compose File Viewer (Beta) see your Compose configuration with contextual docs.
- Deep Dive into GitHub Actions Docker Builds with Docker Desktop (Beta) that streamline accessing detailed GitHub Actions build summaries, including performance metrics and error reports, directly within the Docker Desktop UI.

Air-gapped containers: Ensuring security and compliance
For our business users, we introduce support for air-gapped containers. This feature allows admins to configure Docker Desktop to restrict containers from accessing the external network (internet) while enabling access to the internal network (private network). Docker Desktop can apply a custom set of proxy rules to network traffic from containers. The proxy can be configured to allow network connections, reject network connections, and tunnel through an HTTP or SOCKS proxy (Figure 1). This enhances security by allowing admins to choose which outgoing TCP ports the policy applies to and whether to forward a single HTTP or SOCKS proxy, or to implement policy per destination via a PAC file.

This functionality enables you to scale securely and is especially crucial for organizations with strict security requirements. Learn more about air-gapped containers on our Docker Docs.
Accelerating Builds in Docker Desktop with Docker Build Cloud
Did you know that in your Core Docker Subscription (Personal, Pro, Teams, Business) you have an included allocation of Docker Build Cloud minutes? Yes! This allocation of cloud compute time and shared cache lets you speed up your build times when you’re working with multi-container apps or large repos.
For organizations, your build minutes are shared across your team, so anyone allocated Docker Build Cloud minutes with their Docker Desktop Teams or Business subscription can leverage available minutes and purchase additional minutes if necessary. Docker Build Cloud works for both developers building locally and in CI/CD.
With Docker Desktop, you can use these minutes to accelerate your time to push and gain access to the Docker Build Cloud dashboard (build.docker.com) where you can view build history, manage users, and view your usage stats.
And now, from build.docker.com, you can quickly and easily create your team’s cloud builder using a one-click setup that connects your cloud builder to Docker Desktop. At the same time, you can choose to configure the Build Cloud builder as the default builder in Docker Desktop in about 30 seconds — check the Set the default builder radio button during the Connect via Docker Desktop setup (Figure 2).

Docker Desktop on Windows on Arm
At Microsoft Build, we were thrilled to announce that Docker Desktop is available on Windows on Arm (WoA) as a beta release. This version will be available behind authentication and is aimed at users with Arm-based Windows devices. This feature ensures that developers using these devices can take full advantage of Docker’s capabilities.
To learn more about leveraging WoA to accelerate your development practices, watch the Microsoft Build Session Introducing the Next Generation of Windows on Arm with Ivette Carreras and Jamshed Damkewala. You can also learn about the other better-together opportunities between Microsoft and Docker by visiting our Microsoft Build Docker Page and reading our event highlights blog post.
Compose File Viewer (Beta)
With Compose File Viewer (Beta), developers can now see their Docker Compose configuration file in Docker Desktop, with relevant docs linked. This makes it easier to understand your Compose YAML at a glance, with proper syntax highlighting.
Check out this new File Viewer through the View Configuration option in the Compose command line or by viewing a Compose stack in the Containers tab, then clicking the View Configuration button.
Introducing enhanced CI visibility with GitHub Actions in Docker Desktop
We’re happy to announce the beta release of our new feature for inspecting GitHub Actions builds directly in Docker Desktop. This enhancement provides in-depth summaries of Docker builds, including performance metrics, cache utilization, and detailed error reports. You can download build results as a .dockerbuild archive and inspect them locally using Docker Desktop 4.31. Now you can access all the details about your CI build as if you had reproduced them locally.

Not familiar with the Builds View in Docker Desktop? It’s a feature we introduced last year to give you greater insight into your local Docker builds. Now, with the import functionality, you can explore the details of your remote builds from GitHub Actions just as thoroughly in a fraction of the time. This new capability aims to improve CI/CD efficiency and collaboration by offering greater visibility into your builds. Update to Docker Desktop 4.31 and configure your GitHub Actions with docker/build-push-action@v5 or docker/bake-action@v4 to get started.
Conclusion
With this latest release, we’re doubling down on our mission to support Docker Desktop users with the ability to accelerate innovation, enable security at scale, and enhance productivity.
Stay tuned for additional details and upcoming releases. Thank you for being part of our community as we continuously strive to empower development teams.
Learn more
- Authenticate and update to receive your subscription level’s newest Docker Desktop features.
- New to Docker? Create an account.
- Explore the new beta feature: GitHub Actions Docker Builds with Docker Desktop.
- Visit our Microsoft Build Docker Page to learn about our partnership in supporting Microsoft developers.
- Learn how Docker Build Cloud in Docker Desktop can accelerate builds.
- Secure Your Supply Chain with Docker Scout in Docker Desktop.
- Learn more about air-gapped containers.
- Subscribe to the Docker Newsletter.
Manage Container Files with Ease in Docker Desktop
Scaling Docker Compose Up
Docker Compose‘s simplicity — just run compose up — has been an integral part of developer workflows for a decade, with the first commit occurring in 2013, back when it was called Plum. Although the feature set has grown dramatically in that time, maintaining that experience has always been integral to the spirit of Compose.
In this post, we’ll walk through how to manage microservice sprawl with Docker Compose by importing subprojects from other Git repos.
Maintaining simplicity
Now, perhaps more than ever, that simplicity is key. The complexity of modern software development is undeniable regardless of whether you’re using microservices or a monolith, deploying to the cloud or on-prem, or writing in JavaScript or C.
Compose has not kept up with this “development sprawl” and is even sometimes an obstacle when working on larger, more complex projects. Maintaining Compose to accurately represent your increasingly complex application can require its own expertise, often resulting in out-of-date configuration in YAML or complex makefile tasks.
As an open source project, Compose serves everyone from home lab enthusiasts to transcontinental corporations, which is no small feat, and our commitment to maintaining Compose’s signature simplicity for all users hasn’t changed.
The increased flexibility afforded by Compose watch and include means your project no longer needs to be one-size-fits-all. Now, it’s possible to split your project across Git repos and import services as needed, customizing their configuration in the process.
Application architecture
Let’s take a look at a hypothetical application architecture. To begin, the application is split across two Git repos:
backend— Backend in Python/Flaskfrontend— Single-page app (SPA) frontend in JavaScript/Node.js
While working on the frontend, the developers run without using Docker or Compose, launching npm start on their laptops directly and proxy API requests to a shared staging server (as opposed to running the backend locally). Meanwhile, while working on the backend, developers and CI (for integration tests) share a Compose file and rely on command-line tools like cURL to manually test functionality locally.
We’d like a flexible configuration that enables each group of developers to use their optimal workflow (e.g., leveraging hot reload for the frontend) while also allowing reuse to share project configuration between repos. At first, this seems like an impossible situation to resolve.
Frontend
We can start by adding a compose.yaml file to frontend:
services:
  frontend:
  pull_policy: build
    build:
      context: .
    environment:
      BACKEND_HOST: ${BACKEND_HOST:-https://staging.example.com}
    ports:
      - 8000:8000
Note: If you’re wondering what the Dockerfile looks like, take a look at this samples page for an up-to-date example of best practices generated by docker init.
This is a great start! Running docker compose up will now build the Node.js frontend and make it accessible at http://localhost:8000/.
The BACKEND_HOST environment variable can be used to control where upstream API requests are proxied to and defaults to our shared staging instance.
Unfortunately, we’ve lost the great developer experience afforded by hot module reload (HMR) because everything is inside the container. By adding a develop.watch section, we can preserve that:
services:
  frontend:
    pull_policy: build
    build:
      context: .
    environment:
      BACKEND_HOST: ${BACKEND_HOST:-https://staging.example.com}
    ports:
      - 8000:8000
    develop:
      watch:
        - path: package.json
          action: rebuild
        - path: src/
          target: /app/src
          action: sync
Now, while working on the frontend, developers continue to benefit from the rapid iteration cycles due to HMR. Whenever a file is modified locally in the src/ directory, it’s synchronized into the container at /app/src.
If the package.json file is modified, the entire container is rebuilt, so that the RUN npm install step in the Dockerfile will be re-executed and install the latest dependencies. The best part is the only change to the workflow is running docker compose watch instead of npm start.
Backend
Now, let’s set up a Compose file in backend:
services:
  backend:
    pull_policy: build
    build:
      context: .
    ports:
      - 1234:8080
    develop:
      watch:
        - path: requirements.txt
          action: rebuild
        - path: ./
          target: /app/
          action: sync

include:
  - path: git@github.com:myorg/frontend.git
    env_file: frontend.env
frontend.env
BACKEND_HOST=http://backend:8080Much of this looks very similar to the frontend compose.yaml.
When files in the project directory change locally, they’re synchronized to /app inside the container, so the Flask dev server can handle hot reload. If the requirements.txt is changed, the entire container is rebuilt, so that the RUN pip install step in the Dockerfile will be re-executed and install the latest dependencies.
However, we’ve also added an include section that references the frontend project by its Git repository. The custom env_file points to a local path (in the backend repo), which sets BACKEND_HOST so that the frontend service container will proxy API requests to the backend service container instead of the default.
Note: Remote includes are an experimental feature. You’ll need to set COMPOSE_EXPERIMENTAL_GIT_REMOTE=1 in your environment to use Git references.
With this configuration, developers can now run the full stack while keeping the frontend and backend Compose projects independent and even in different Git repositories.
As developers, we’re used to sharing code library dependencies, and the include keyword brings this same reusability and convenience to your Compose development configurations.
What’s next?
There are still some rough edges. For example, the remote project is cloned to a temporary directory, which makes it impractical to use with watch mode when imported, as the files are not available for editing. Enabling bigger and more complex software projects to use Compose for flexible, personal environments is something we’re continuing to improve upon.
If you’re a Docker customer using Compose across microservices or repositories, we’d love to hear how we can better support you. Get in touch!
Learn more
- Get the latest release of Docker Desktop.
- Vote on what’s next! Check out our public roadmap.
- Have questions? The Docker community is here to help.
- New to Docker? Get started.
Introducing Docker Build Cloud: A New Solution to Speed Up Build Times and Improve Developer Productivity
Developers face a growing predicament — the long wait times for builds to complete. In fact, the average build time increased by an average of 15.9% between 2020 and 2021, according to a survey by Incredibuild. On average, developers lose around one hour each day, the study says, and this delay is steadily rising year after year. The impact on productivity and developer experience can cost even a small organization $420,000 per year (based on an annualized salary of $140K and a team of 25 developers).
We’re developers, too, so we explored ways to speed up build time without sacrificing the local development experience we love. That’s how Docker Build Cloud was born.
“The new products we announced meet development teams where they are with ‘just enough cloud,’ seamlessly blurring the boundaries between local and remote development. In doing so, we’re enabling these teams to accelerate their delivery of secure applications critical to their businesses.” — Giri Sreenivas, Chief Product Officer, Docker
Temporary fixes don’t last
Developers and their employers have attempted to address resource constraints that slow build times and drain productivity in a few common ways, the Incredibuild study says, including upgrading hardware (cited by 44% of respondents) and reducing codebase size (acknowledged by 33%). Although these tactics offer a temporary boost, they’re far from sustainable. A better solution is required — one that speeds up build times and improves team collaboration by eliminating redundant builds.
Build up to 39x faster with Docker Build Cloud
In the constantly evolving landscape of software development, two investment areas continue to trend upwards: moving development to the cloud and accelerating builds. The concept behind Docker Build Cloud is simple. By leveraging cloud compute and cache, developers can build faster and improve collaboration with their team.
Building in the cloud speeds up build times because the cloud provides access to faster compute resources than are available on a developer’s local machine, and this approach provides more consistency between developers who may have newer or older machines.
Shared cache speeds up build times because when one team member initiates a build, the cached results become instantly accessible to others, thereby eliminating unnecessary builds and speeding up the development cycle. No more waiting around for each build to complete independently.
The combination of building in the cloud and shared cache helps developers save time and improve productivity. Developers can get back to coding on parallel tasks while builds complete, and they get the results of builds back faster to incorporate into their work.
For example, one of our technology customers who develops enterprise collaboration software was able to reduce their build time from an average duration of 15-20 minutes to less than 2 minutes using Docker Build Cloud.
Multi-architecture builds made effortless
Today, developers who need to create applications for both Intel (AMD64) and Apple Silicon/AWS Graviton (Arm64) chipsets must have multiple native builders or configure slow emulators to successfully build for their deployment targets. Docker Build Cloud offers native support for multi-architecture builds, eliminating the need for setting up and maintaining multiple native builders. This support removes the challenges associated with emulation, further improving build efficiency.
An e-commerce customer simplified their CI toolchain. Prior to Docker Build Cloud, they were leveraging GitHub Actions, GitLab runners, plus a custom GitLab runner to handle ARM architecture. Due to Build Cloud’s dual AMD and ARM builders, our customer reduced their complexity and sped up their pipelines.
Seamless integration with the tools you love
Developer tools should enhance developer experience, not add new points of friction. We’ve designed Docker Build Cloud to be easy to set up wherever you run your builds without requiring a massive lift-and-shift effort. Docker Build Cloud also works well with Docker Compose, GitHub Actions, and other CI solutions. This means you can seamlessly incorporate Docker Build Cloud into your existing development tools and services and immediately start reaping the benefits of enhanced speed and efficiency.
Try Docker Build Cloud today
Docker Build Cloud will enable a faster, more efficient Docker image-building process. Whether you’re a seasoned developer or just getting started, embrace the power of the cloud in your local development environment. Welcome to the future of Docker image builds with Docker Build Cloud.
Learn more
- See the video demo Introducing Docker Build Cloud.
- Watch the webinar Docker Build Cloud: Reclaim Your Dev Time with Fast, Multi-Architecture Builds.
- Get the latest release of Docker Desktop.
- Vote on what’s next! Check out our public roadmap.
- Have questions? The Docker community is here to help.
- New to Docker? Get started.